How To Get Out of Auto Mode
For camera enthusiasts, Auto Mode is like quicksand. You start using it and realize how easy it is. The camera does everything for you and you just have to focus and press the shutter button. And that right there is the sneaky side of Auto Mode. It tries to drag you in with its eye-catching ease of use and once you’re there, you don’t want to leave. It feels safe, and soon your creativity begins to become limited.
Well, I am here to be the one to pull you out and show you the glorious wonders that the camera provides when it is out of Auto Mode.
First and foremost, however, I have to explain what Auto Mode is and why it is an option and also when to switch to it. Auto Mode is located on your Mode Dial and is a setting on your camera that has every exposure option of your camera (what makes the image brighter or darker) on autopilot. Meaning that when you take the lens cap off and begin pointing your camera at something, the settings will automatically adjust themselves to give you the most neutral balanced image.
I know, that seems great, right? WRONG. Although Auto Mode is very helpful for a complete beginner that is picking up a camera for the first time, it is not, and let me repeat this, NOT beneficial if you want to increase your skills as a photographer.
Auto Mode is extremely limiting and does not allow you to use your creativity to the fullest when out photographing. The only time I recommend switching to Auto Mode is when you are handing your camera to a stranger to take a picture of you. Other than that you should not be in Auto Mode. But what does it mean to not be in Auto Mode? What other options are there?
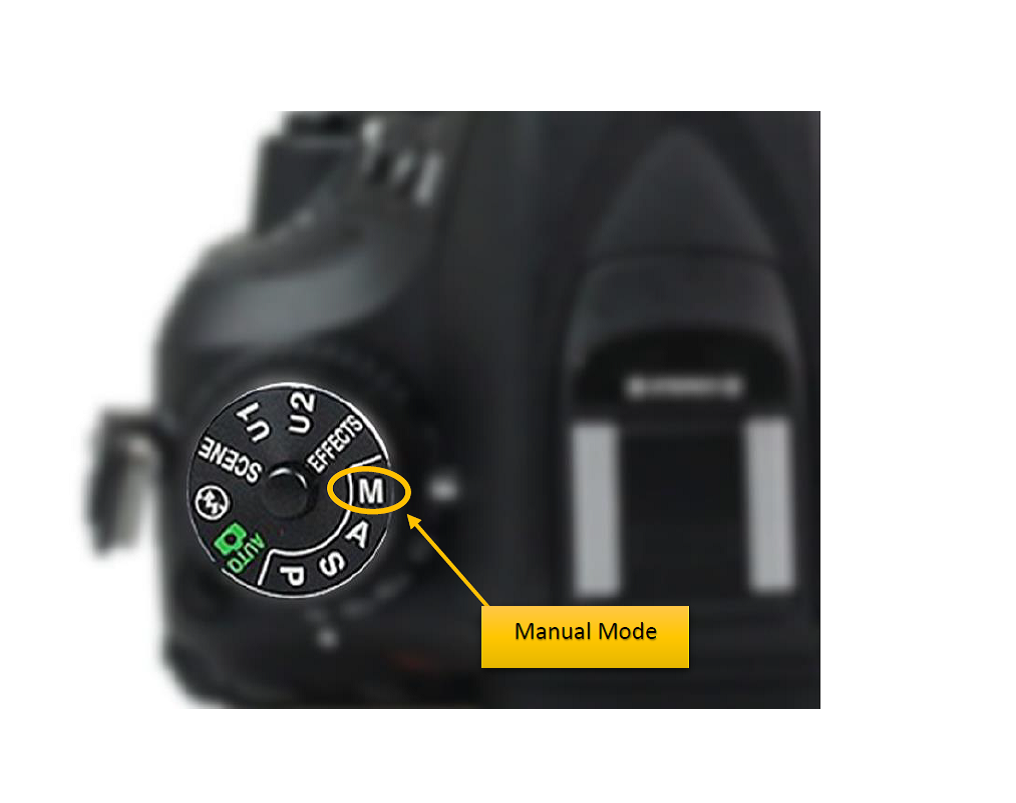
As seen on the Mode Dial, there are 3 main options for your camera to be “switched to.” There is Manual Mode, Shutter Priority Mode, and Aperture Priority Mode.
So now you’re out of Auto Mode. Congratulations! You have officially taken the first step in upping your photo game. And as I keep saying, Manual Mode is where your creativity can be unleashed. But what does that even mean?
When taking a picture, certain aspects make up an image that you need to understand to capture your subject in a specific way you want to. In this post, we will be talking about the exposure of an image (how bright or dark an image is).
The 3 Factors of Exposure:
-
Shutter Speed
-
Aperture
-
ISO
Before exploring each factor, I want to let you know that all 3 of them control the camera’s exposure which means how bright or dark the image will be. But, they all have different functions that can help you create unique images!

Shutter Speed
Shutter Speed controls how much “motion” will be captured in the image.
For example, any action sport where you see the athlete frozen in the air. That’s shutter speed.
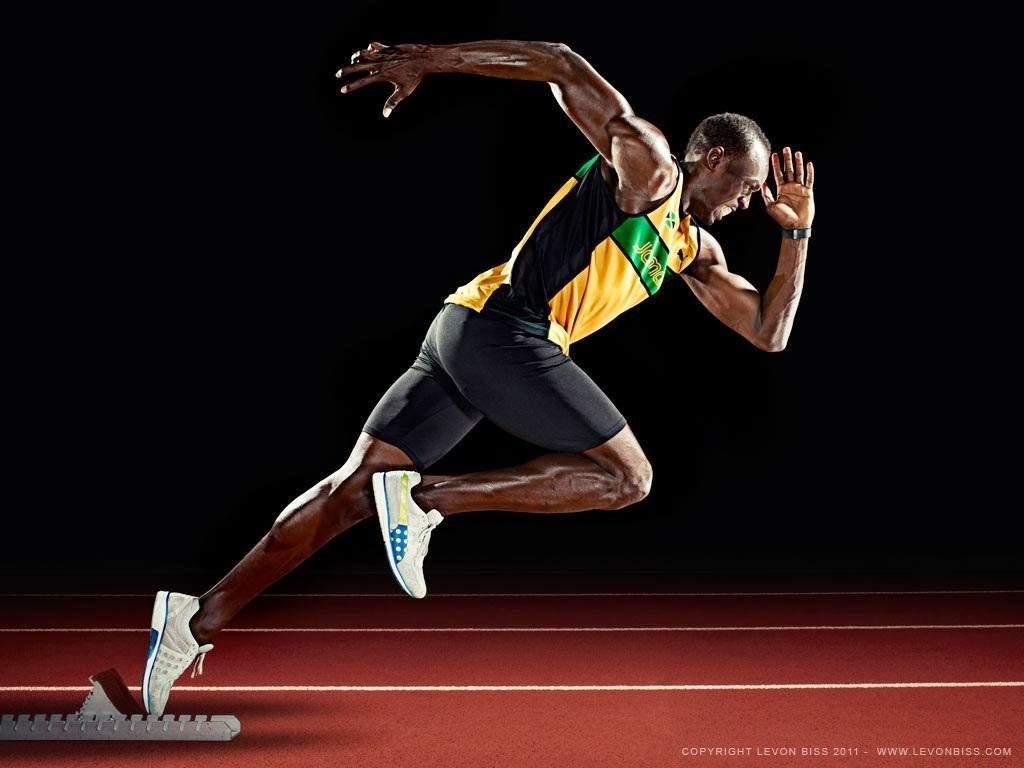
Since this was captured with a fast shutter speed and the subject is “frozen.”
When you see an image of a seemingly silky smooth waterfall. That is also shutter speed. Shutter speed determines the blurriness of the subject, and different shutter speeds create different effects.
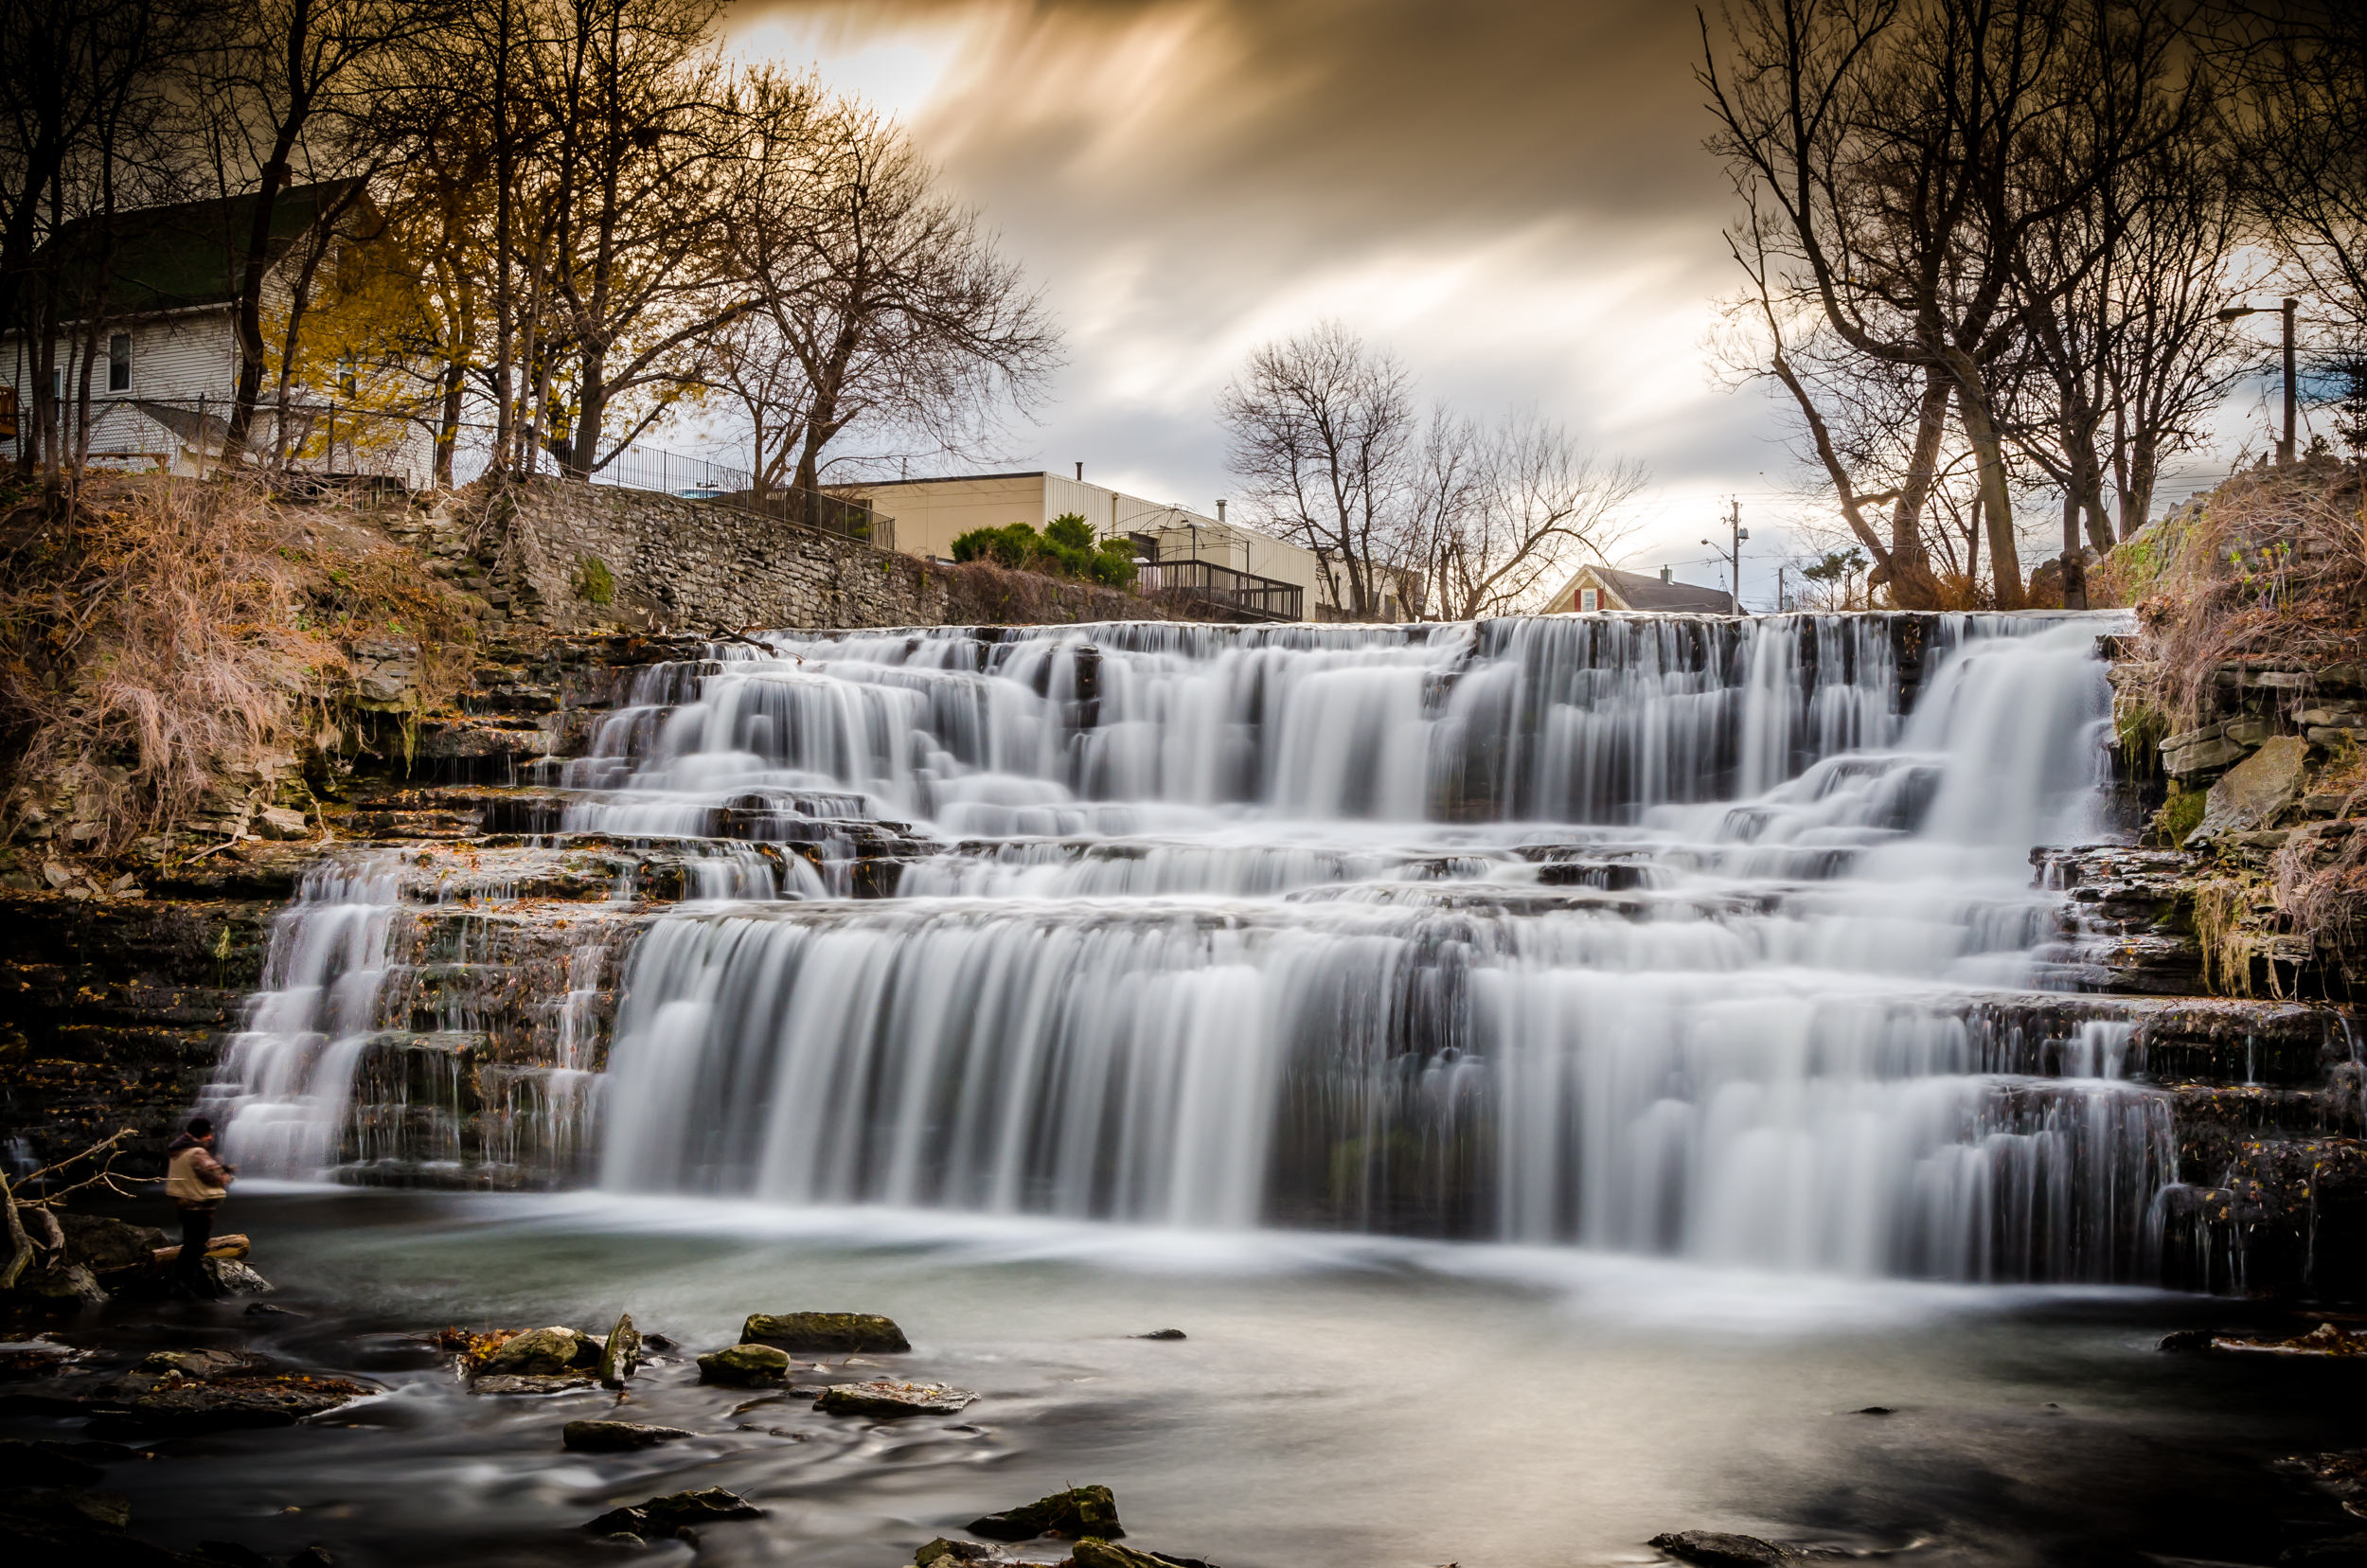
With a slow shutter speed, you can blur the motion of the subject.
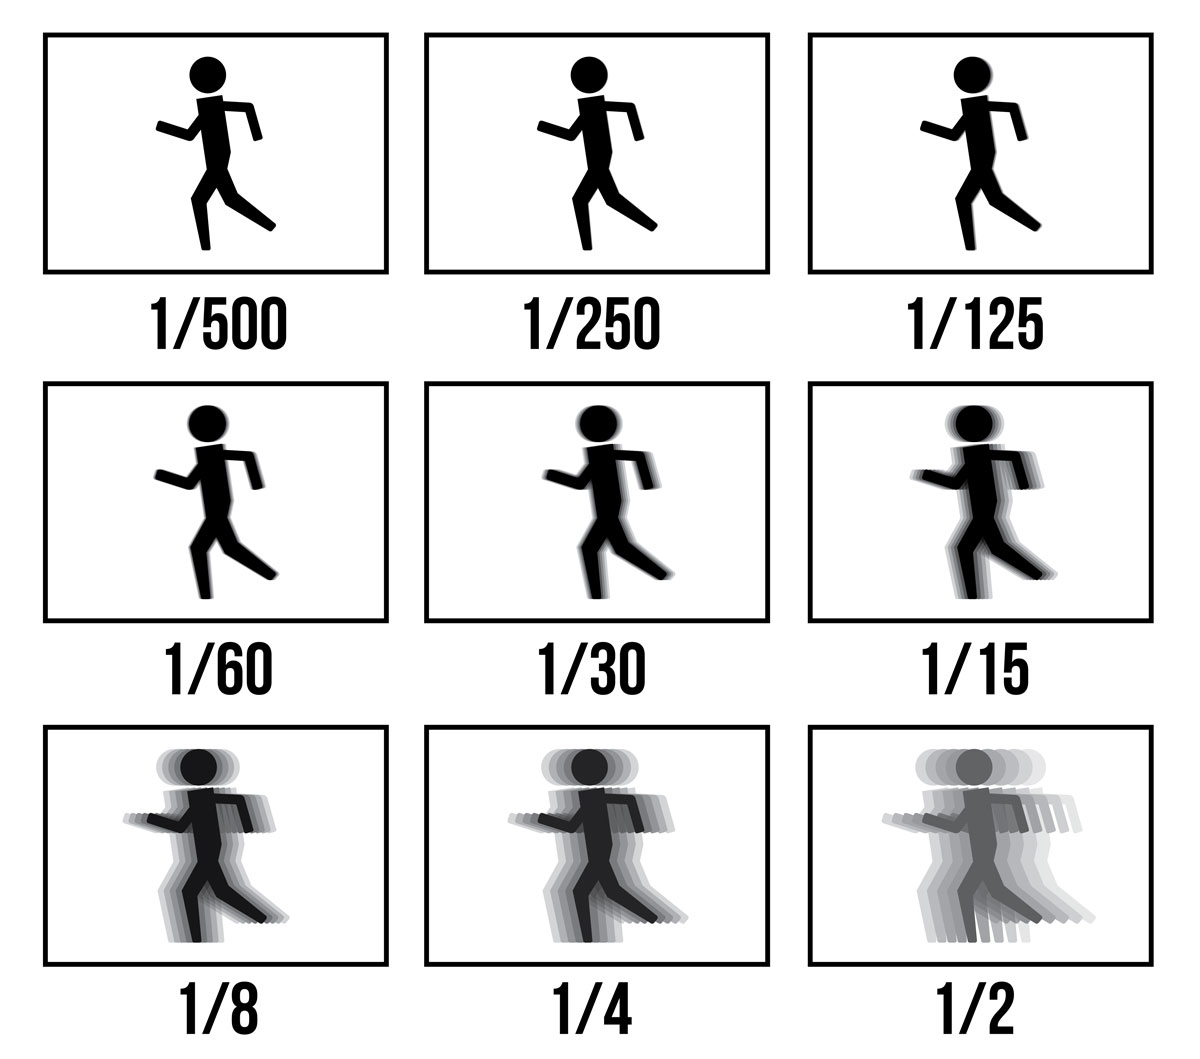
Shutter speeds are labeled in seconds, but mainly fractional seconds. You will see numbers like 1/400 or 1/80. Those are different shutter speeds. They can also go up to actual whole seconds, with the highest being 30 seconds.
Shutter speed also is one of the factors that control how bright or dark the image is. A faster shutter speed (like 1/500 or 1/1000) creates a darker image. A slower shutter speed (like 1/4 or 2 sec.) creates a brighter image.
Think of shutter speed as the shutters of your windows. Pretend you bring them down and up quickly (replicating a fast shutter speed). Since it was really quick, not a lot of light came in. This is the same as your camera. If you take your lens off you can actually see your camera doing this. When you press the shutter button, you can see the shutter of the camera flip up and then flip down.
The longer it is up the more light it is letting in i.e. the brighter the image. The same goes if you were to leave your window shutters open for a longer period of time. More light would come in.
A FASTER shutter speed FREEZES an object and a SLOWER shutter speed BLURS it.
Aperture
Aperture controls how blurry some parts of the image will be. You can clearly see this when viewing portraits of people or close up images of objects. With these images, you will see that the background is really blurred (this is also known as a bokeh effect). That blurriness is decided by the aperture. The same goes for a landscape image. If you want the whole image, front to back to be in focus, the aperture controls that.
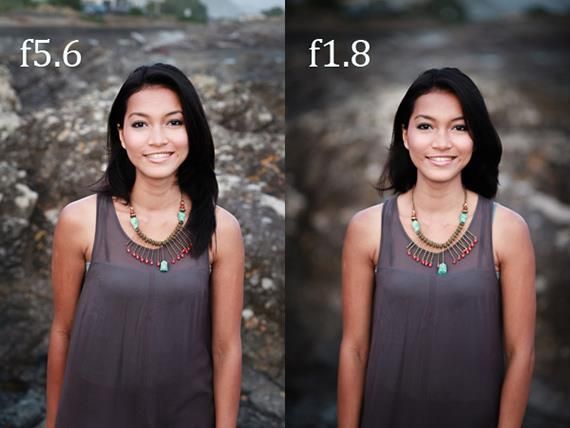
As you can see, the right image has a very blurry background because a larger aperture is being used.
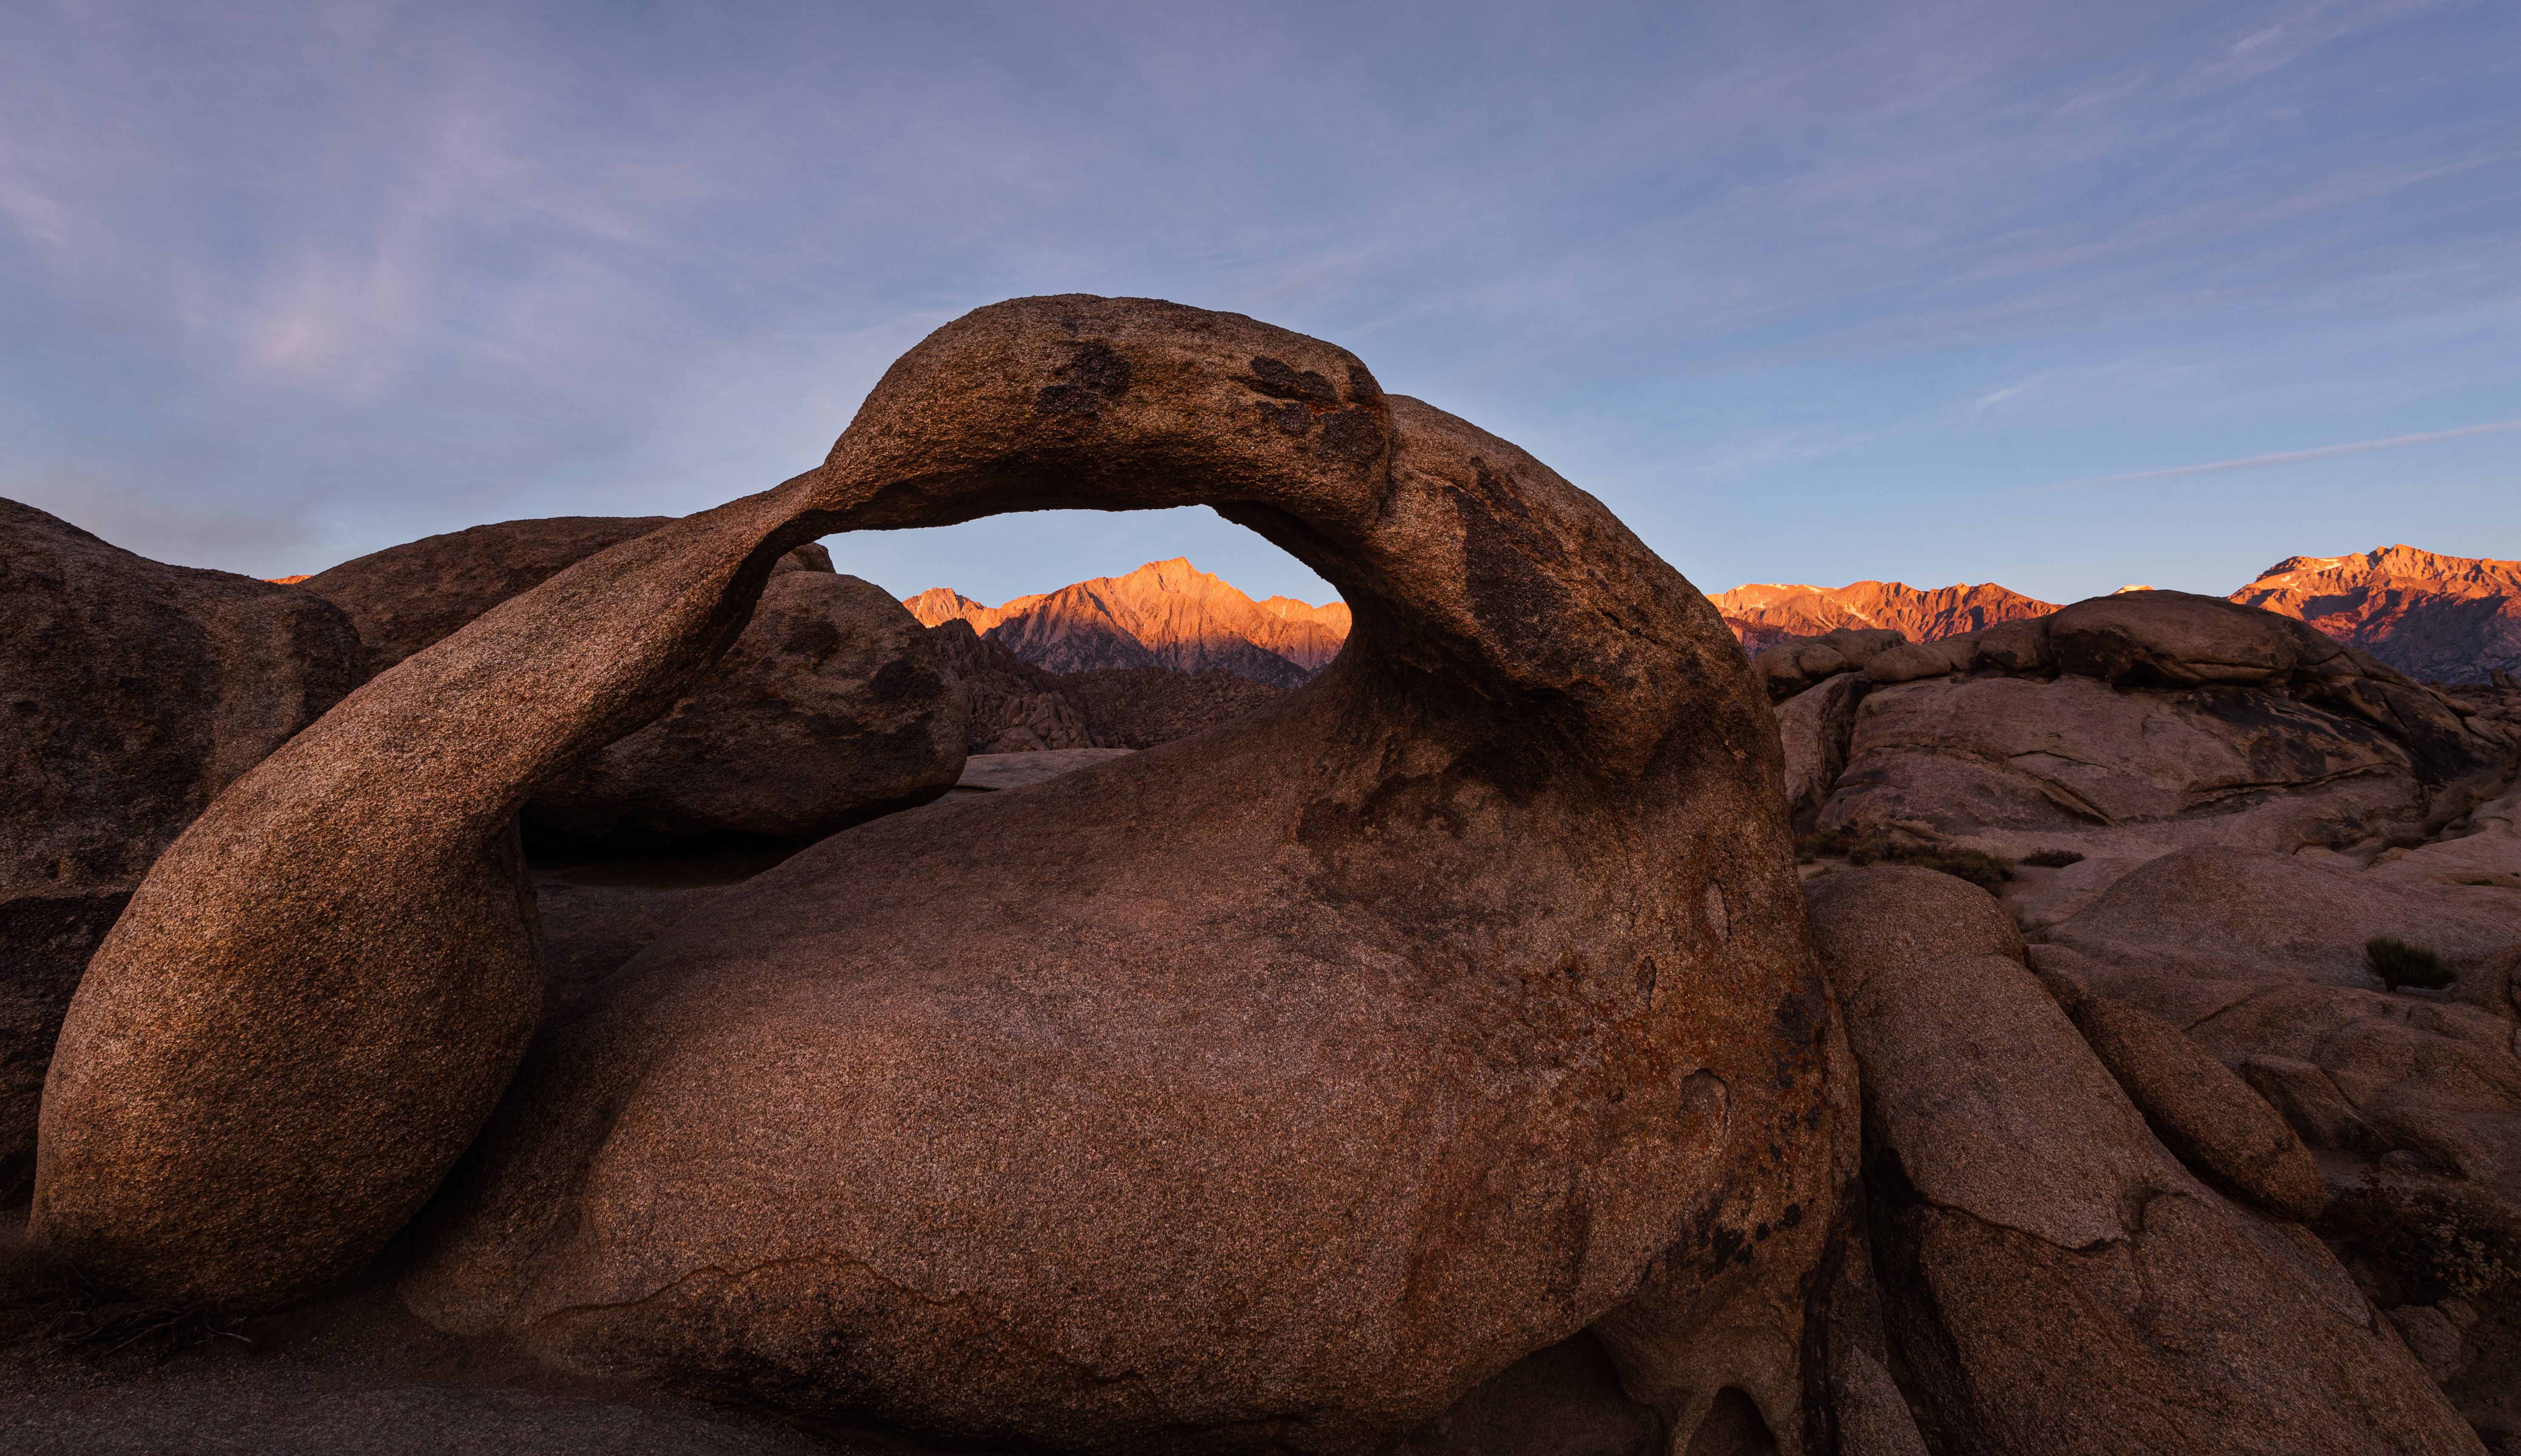
In this image, a small aperture of f/11 was used to have the whole image in focus.
You will see or hear aperture be referred to as the f-stop or f-number. These all mean the same thing. Some examples of apertures include f/3.5 or f/11. A large aperture (like f/3.5) makes the background of the image more blurry. A smaller aperture (like f/11) makes the whole image in focus and sharp. This can also be described as Depth of Field (DOF).
DOF is the distance between the closest and farthest objects in a photo that appears sharp.
So a small DOF (or large aperture) will only apply focus on certain parts of the image, while a large DOF (smaller aperture) will have the whole image from back to front in focus. — Repeat that sentence a few times to fully understand it.
Choosing the aperture depends on what kind of image you want to capture.
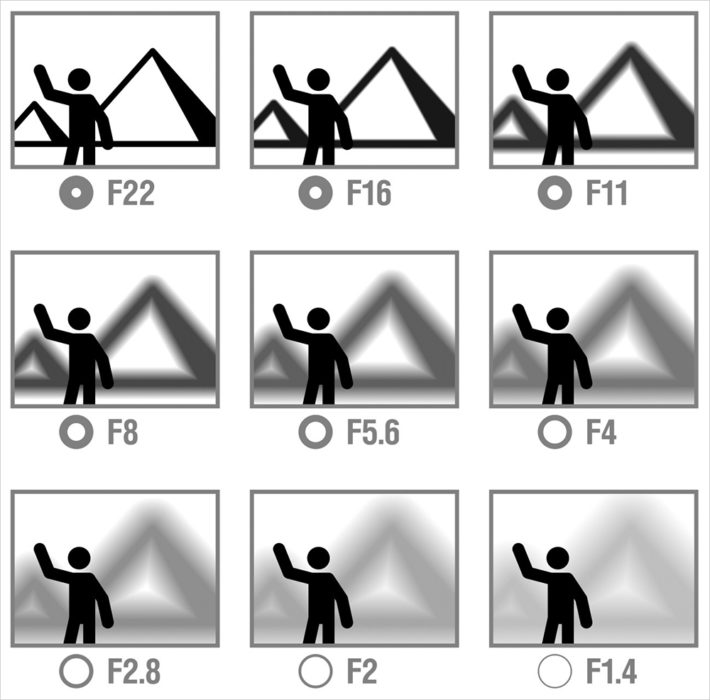
Just like shutter speed, the aperture controls how bright or dark the image is. You can think of the aperture like the pupils of your eye.
When you go to a dark room and turn the light on, your pupils shrink. When you are just in a dark room, your pupils get bigger. This is exactly what the aperture on your camera does.
A big aperture (like f/3.5) lets in more light, making the image brighter, and a smaller aperture (like f/22) lets less light in, making the image darker. You can even see this effect on certain lenses.
A LARGE aperture BLURS the background and a SMALL aperture makes the image have SHARP FOCUS from foreground to background.
ISO
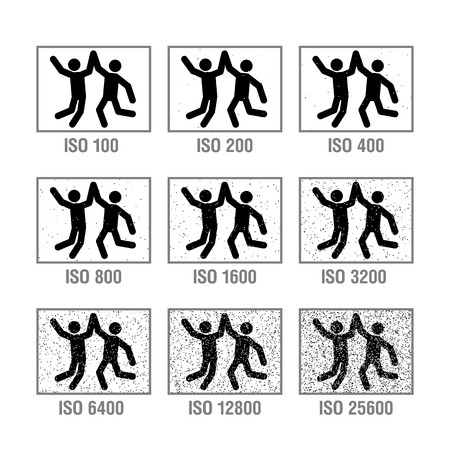
ISO is the third factor that controls your camera’s exposure and is also the setting that you will change the least out of the three. Unlike shutter speed and aperture, ISO’s main function is to brighten up or darken the image. ISO is displayed as numbers like 100, 200, and so on, all the way up to around 25,600 (depending on the type of camera). The higher the number, the brighter the image. Although this seems fairly simple, there is a catch.
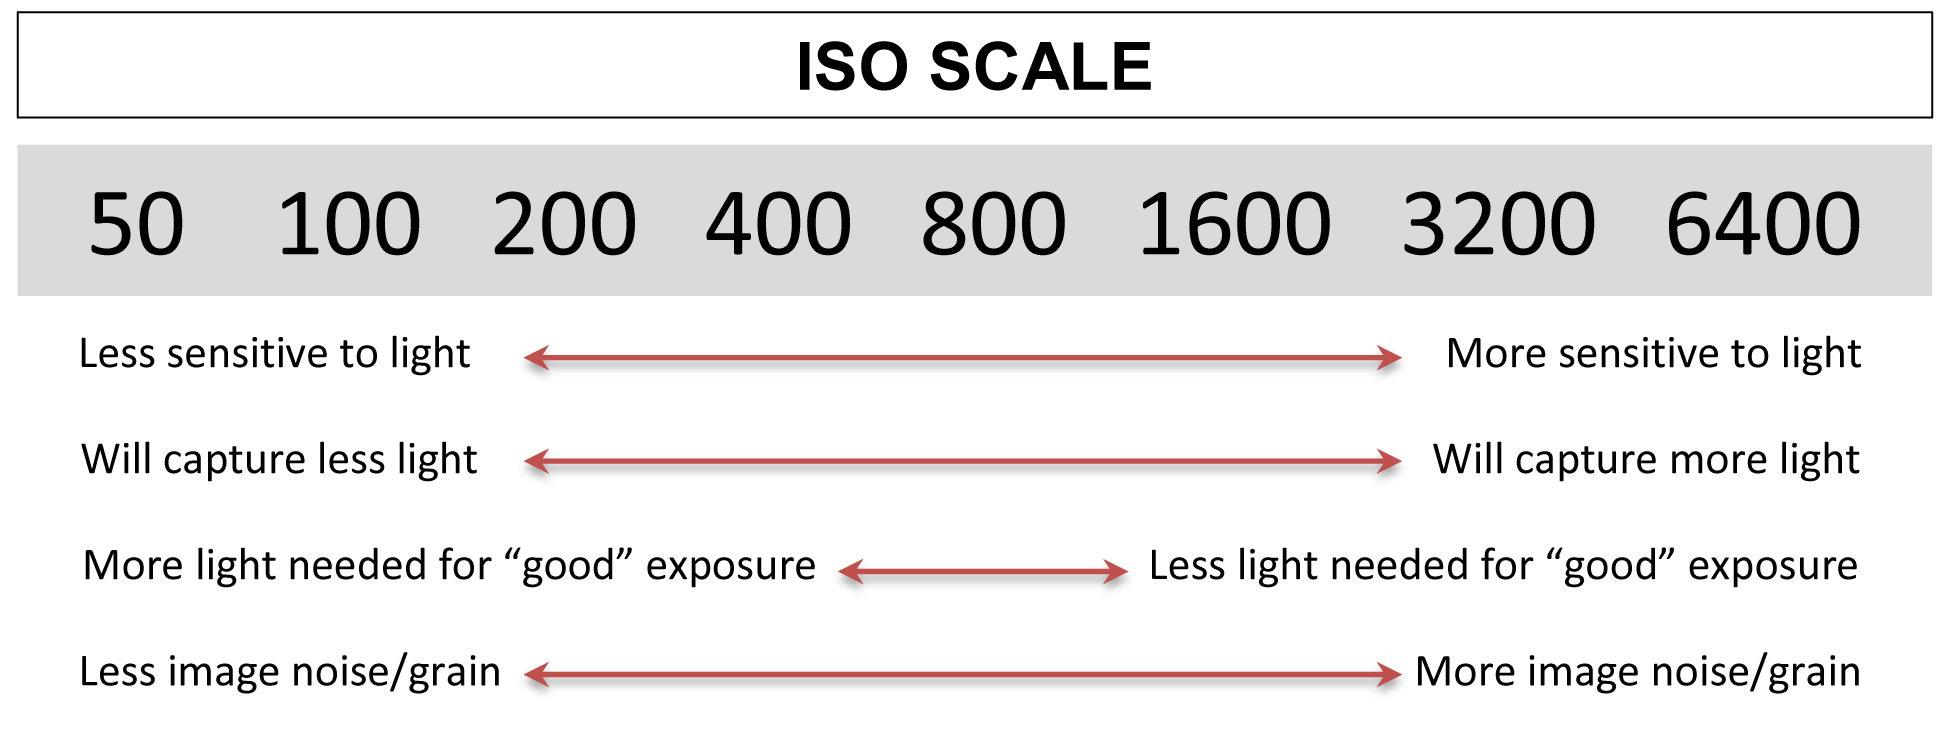
There is a reason why if you want to brighten up your image, your first thought would NOT be to bump up your ISO. The reason why? NOISE. Noise describes visual distortion, which is basically the grainy look found in film photographs. To simplify, the higher the ISO number, the more noise that is introduced into your photograph.
If you haven’t guessed by now, noise in your image is bad, as it ruins the quality of the image. So now another question arises. Why would you ever bump up your ISO if it just creates noise in your photographs? Great question! The answer more or less lies in a specific niche of photography called astrophotography or night photography. Since a higher ISO brightens up the image, this is perfect for night photography because as you can guess, it is usually really dark. But since you are increasing the ISO, the noise will increase as well. Getting rid of noise is something you can do in the editing process.
The number one important thing I want you to take away regarding ISO is that it should be THE LAST FACTOR you go to when changing your exposure. ALWAYS ALWAYS see if you can change the exposure with shutter speed or aperture first (think of ISO as the last resort to changing the exposure). I say this because a lot of people will see ISO and see that when they raise it to 1600, their image magically gets brighter. This is true, but what they don’t know is that when they take the picture, the image is essentially ruined, as it will be covered in noise.
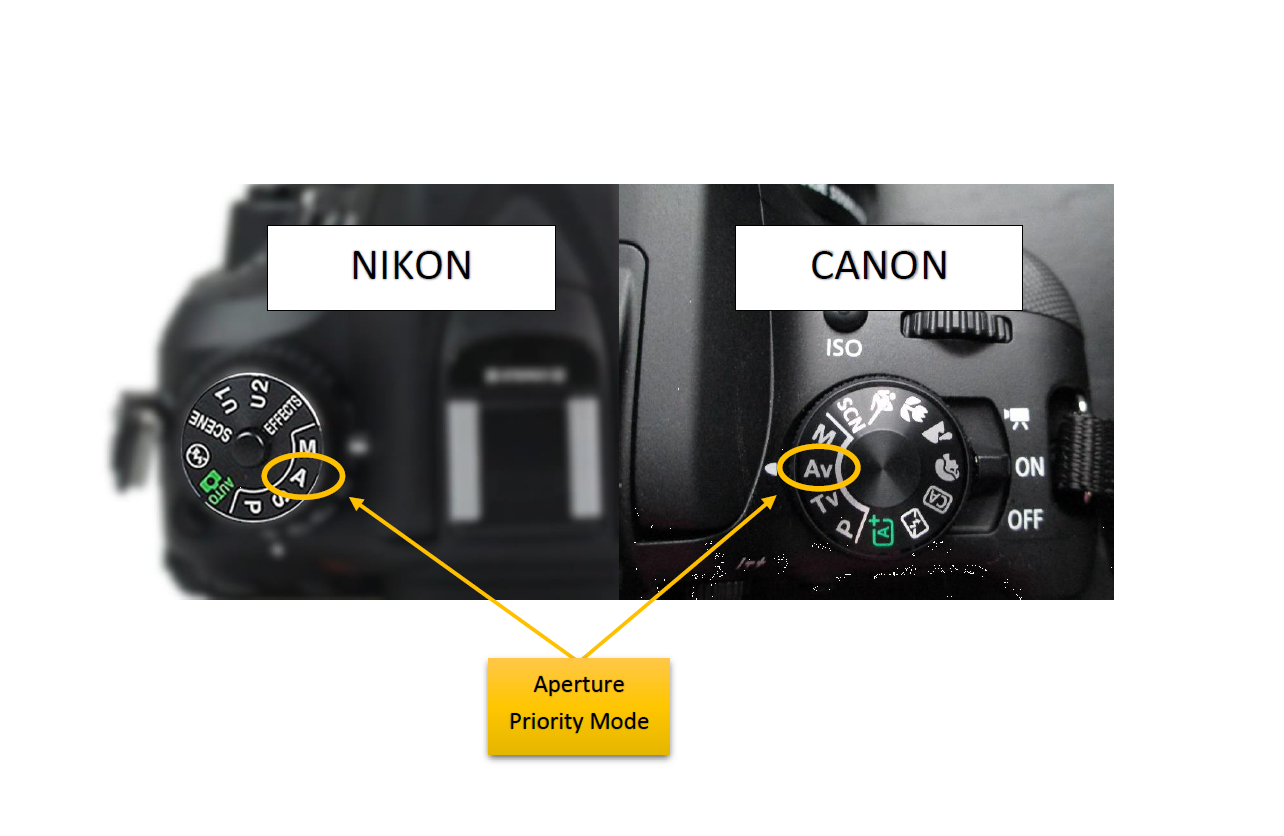
Aperture/Shutter Speed Priority Mode
If you read my article on “11 Crucial Parts You Should Know On Your New Camera” you might remember me talking about Aperture Priority Mode and Shutter Speed Priority Mode. In a nutshell, if you are on Shutter Speed Priority Mode, you can only change the shutter speed, and the other settings (like aperture and ISO), are changed automatically.
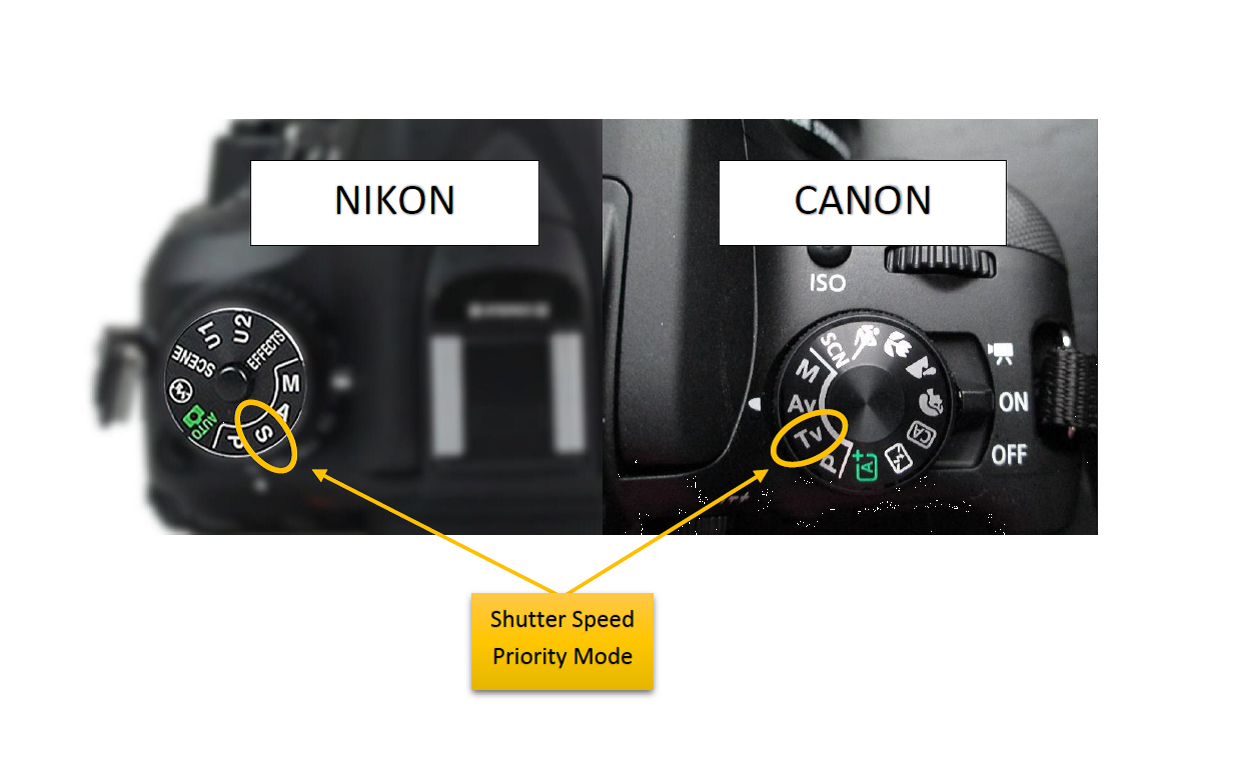
You can think of it as the middle man between Auto mode and Manual Mode. You are not in control of everything on your camera, but you are also not completely at the mercy of your camera. The same idea applies to Aperture Priority Mode. In that mode, you can only change the aperture, and then the remaining factors (shutter speed and ISO) change automatically. Even if you have mastered Manual Mode, Shutter Speed or Aperture Priority Mode are still good options if your shot only requires you to control one of your settings.
So there you have it. With all of the knowledge you have on these three factors of exposure, you have all the tools to go out and take amazing images! (With a lot of practice of course).
Before you run out the door, there are a few things I want to summarize and explain.
First off, the question begs how do you change these settings. Since most cameras are different I cannot give you an exact answer to where on your camera, the shutter speed, aperture, and ISO buttons/dials are located. I can encourage, however, to do a quick search on YouTube asking “How to change the shutter speed/aperture/ISO” on whatever camera model you have. This will surely give you the answer.
I can also confidently tell you that the best way to “memorize” everything I told you is to use it. I’m talking about good old trial and error. The way to remember that a high shutter speed freezes everything is to take a picture of a water fountain and see the individual water droplets frozen in the air. The way to remember to rarely bump up the ISO (in normal daylight conditions) is to accidentally take a lot of pictures at ISO 1600, and get home and realize that all of your images are really noisy. It’s the sad cold hard truth that most, if not all photographers have had to face one time or another.
So don’t sweat it too much if you come home thinking your images are ruined. Even if you decide that you can’t use them for anything, at least you learned from your mistakes and gained experience. Photography is all about practicing and progressing. No one takes pictures for the first time and captures a “National Geographic Cover Photo.” It takes years of dedication and hard work to master photography.
So go out there and start photographing!