The moon is simply amazing.
We have seen it our whole life, watched it change shapes, and even tried to make out faces along its distant surface.
It can quite literally be the light in the darkness that guides you to wherever you may want to go and is just mesmerizing to look at.
It is also amazing to photograph! One of the great features about the moon is that you don’t need to go to a special dark location to see it. It can be viewed anywhere from a remote cornfield in Nebraska to the middle of Times Square in New York.
No matter the amount of light pollution, the moon keeps on shining. This is great because it is so easily accessible to photograph! For me, it was the first night sky object I ever took a picture of!
The best part is that it is very easy to do, and can be an amazing confidence booster when starting out.
So take your camera out, look up, and let’s learn how to photograph the moon!
Different Phases of the Moon
Obviously, when you look up at the Moon during different nights, it changes. Sometimes it looks like a small sliver while other nights it is a full gleaming ball of light.
What you are seeing are the different phases of the moon. You might recognize the terms, New Moon and Full Moon. During a new moon, the moon is positioned between the earth and the sun. That is the time of the month when you don’t see the moon at all during the night.
A full moon is when the earth, moon, and sun are all aligned. During this time, the moon illuminates the entire landscape, making this the most popular time to photograph the moon.
There are 4 other defining words that fill in the phases in between a new moon and a full moon.
- Crescent: the moon is less than half illuminated
- Gibbous: the moon is more than half illuminated
- Waning: the moon is shrinking in illumination
- Waxing: the moon is growing in illumination
Photograph the moon at different phases and see which one you like best. If you get more serious about moon photography, you can even make an entire collage of the different moon phases.
Here are some websites and applications that can tell you when the different moon phases occur:
- https://www.timeanddate.com/moon/phases/
- https://stardate.org/nightsky/moon
- https://www.photopills.com/ (PAID)
- https://www.photoephemeris.com/ (PAID)
Camera Equipment
Camera (APS-C Sensor Recommended)
When photographing the moon, you want to zoom in as much as you can. Before we get into lens options, I want to explain different sensors.
First the technical aspects. Before digital photography became the dominant choice, the standard in still photography was 35mm film. A “full frame” camera sensor is the same size as a single negative (or frame) on a 35mm roll of film.
An APS-C camera sensor has 1.5x crop factor because its sensor is smaller.
For example, a focal length of 300mm on a full frame camera converts to a focal length of 450mm on an APS-C camera (300 x 1.5 = 450). You can use this for any lens you are transferring over to your APS-C camera from your full frame camera.
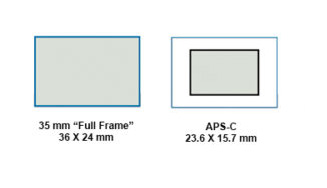
The grey represents the camera frame.
But Adam, what does this have to do with photographing the moon??
A bigger focal length = a more zoomed-in shot! So if you have an APS-C camera, you get an extra 1.5x zoom! This is great for moon photography because the whole idea is for the moon to fill the frame as much as possible.
Lens
A lot of people will see these photographers with crazy huge lenses shooting the moon, with focal lengths at 1,000mm and beyond! You DO NOT need that big of a lens when starting out!
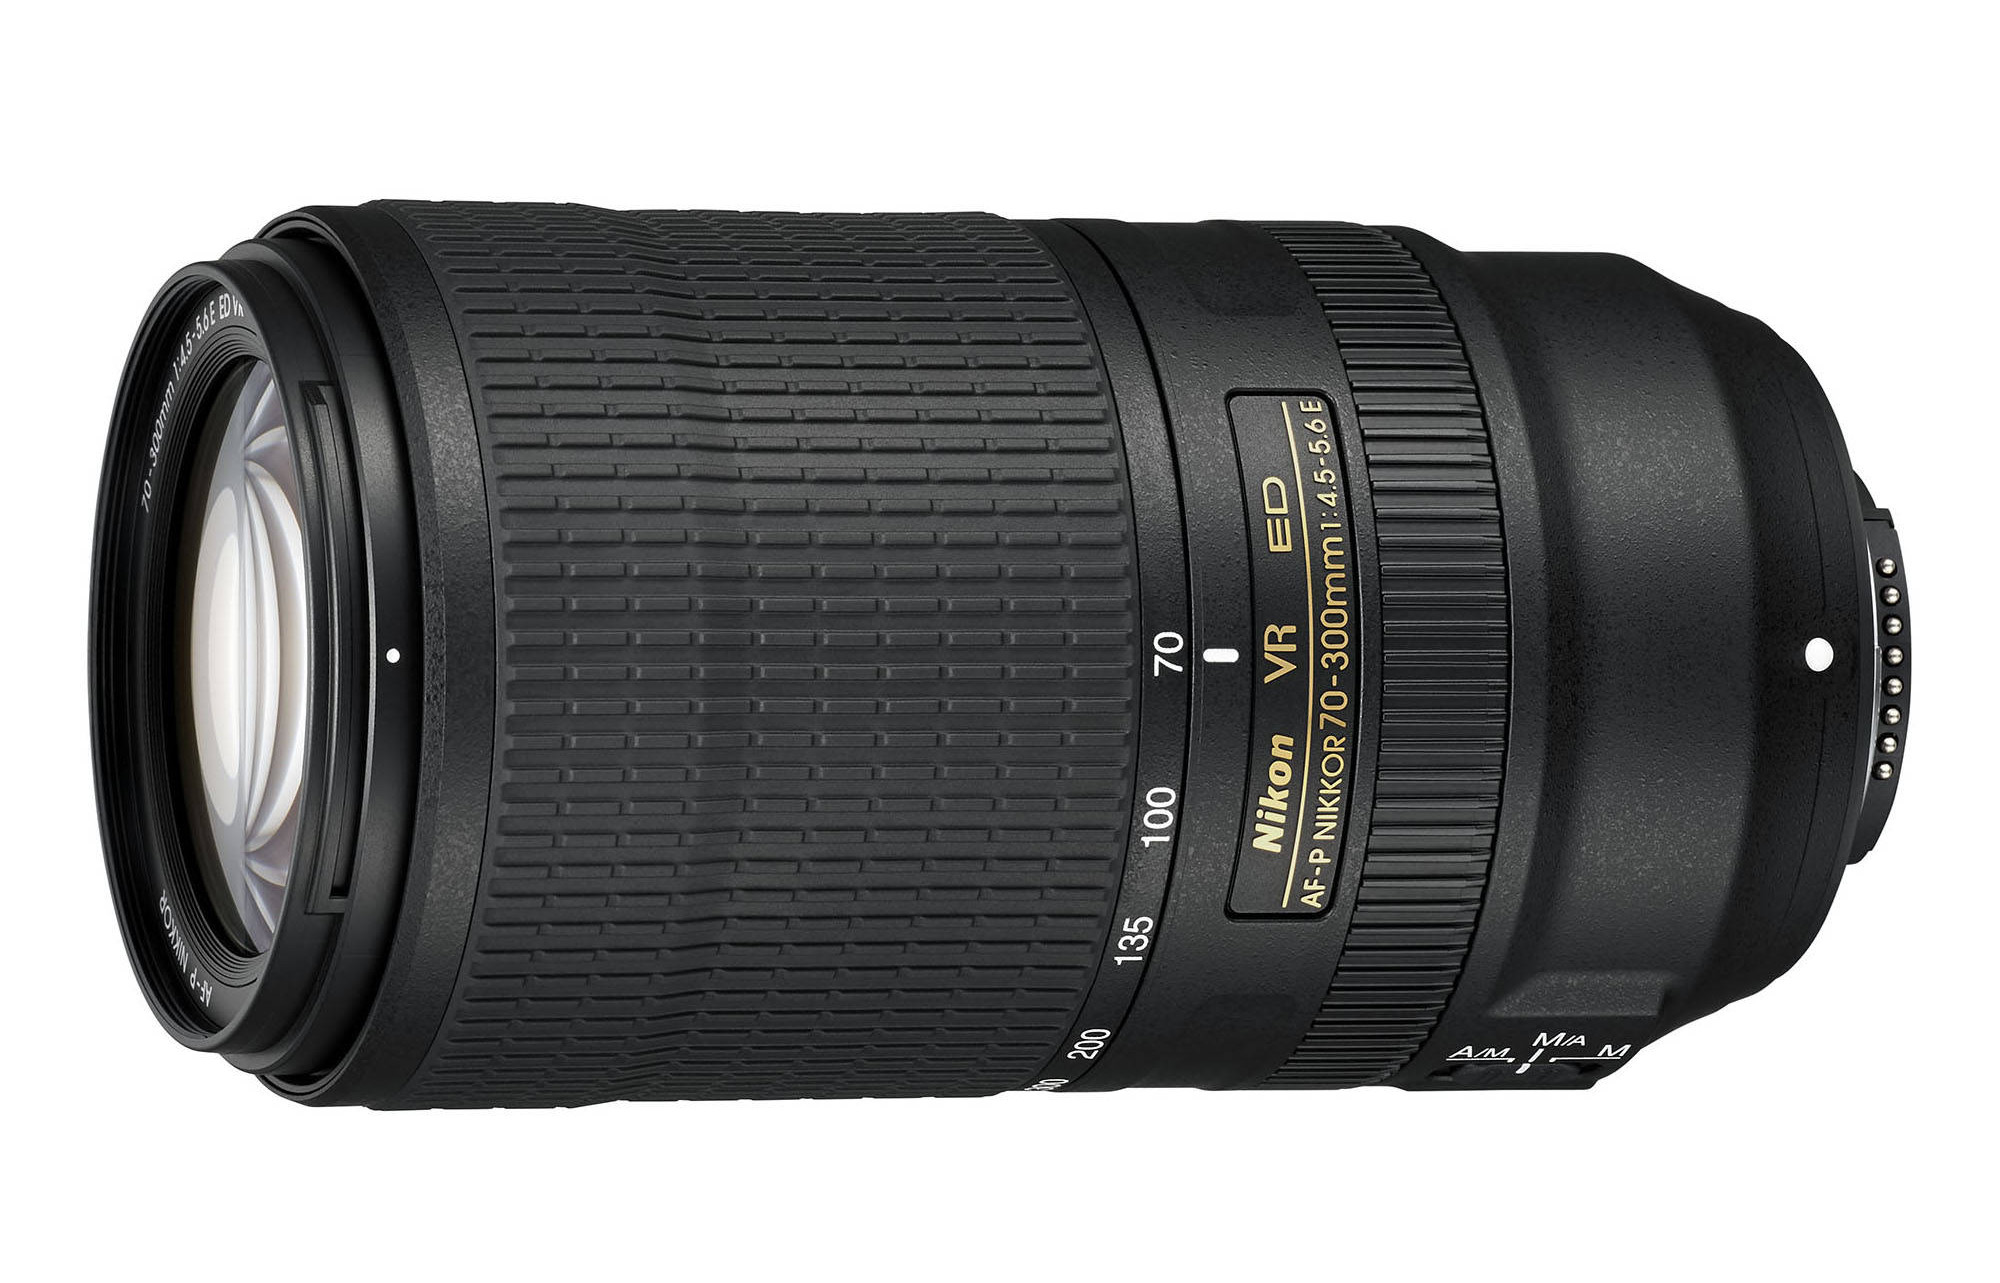
A regular 70-300mm lens will do just fine. The best part is that these lenses are pretty cheap and offer great results.
Tripod
ALWAYS use a tripod!!!
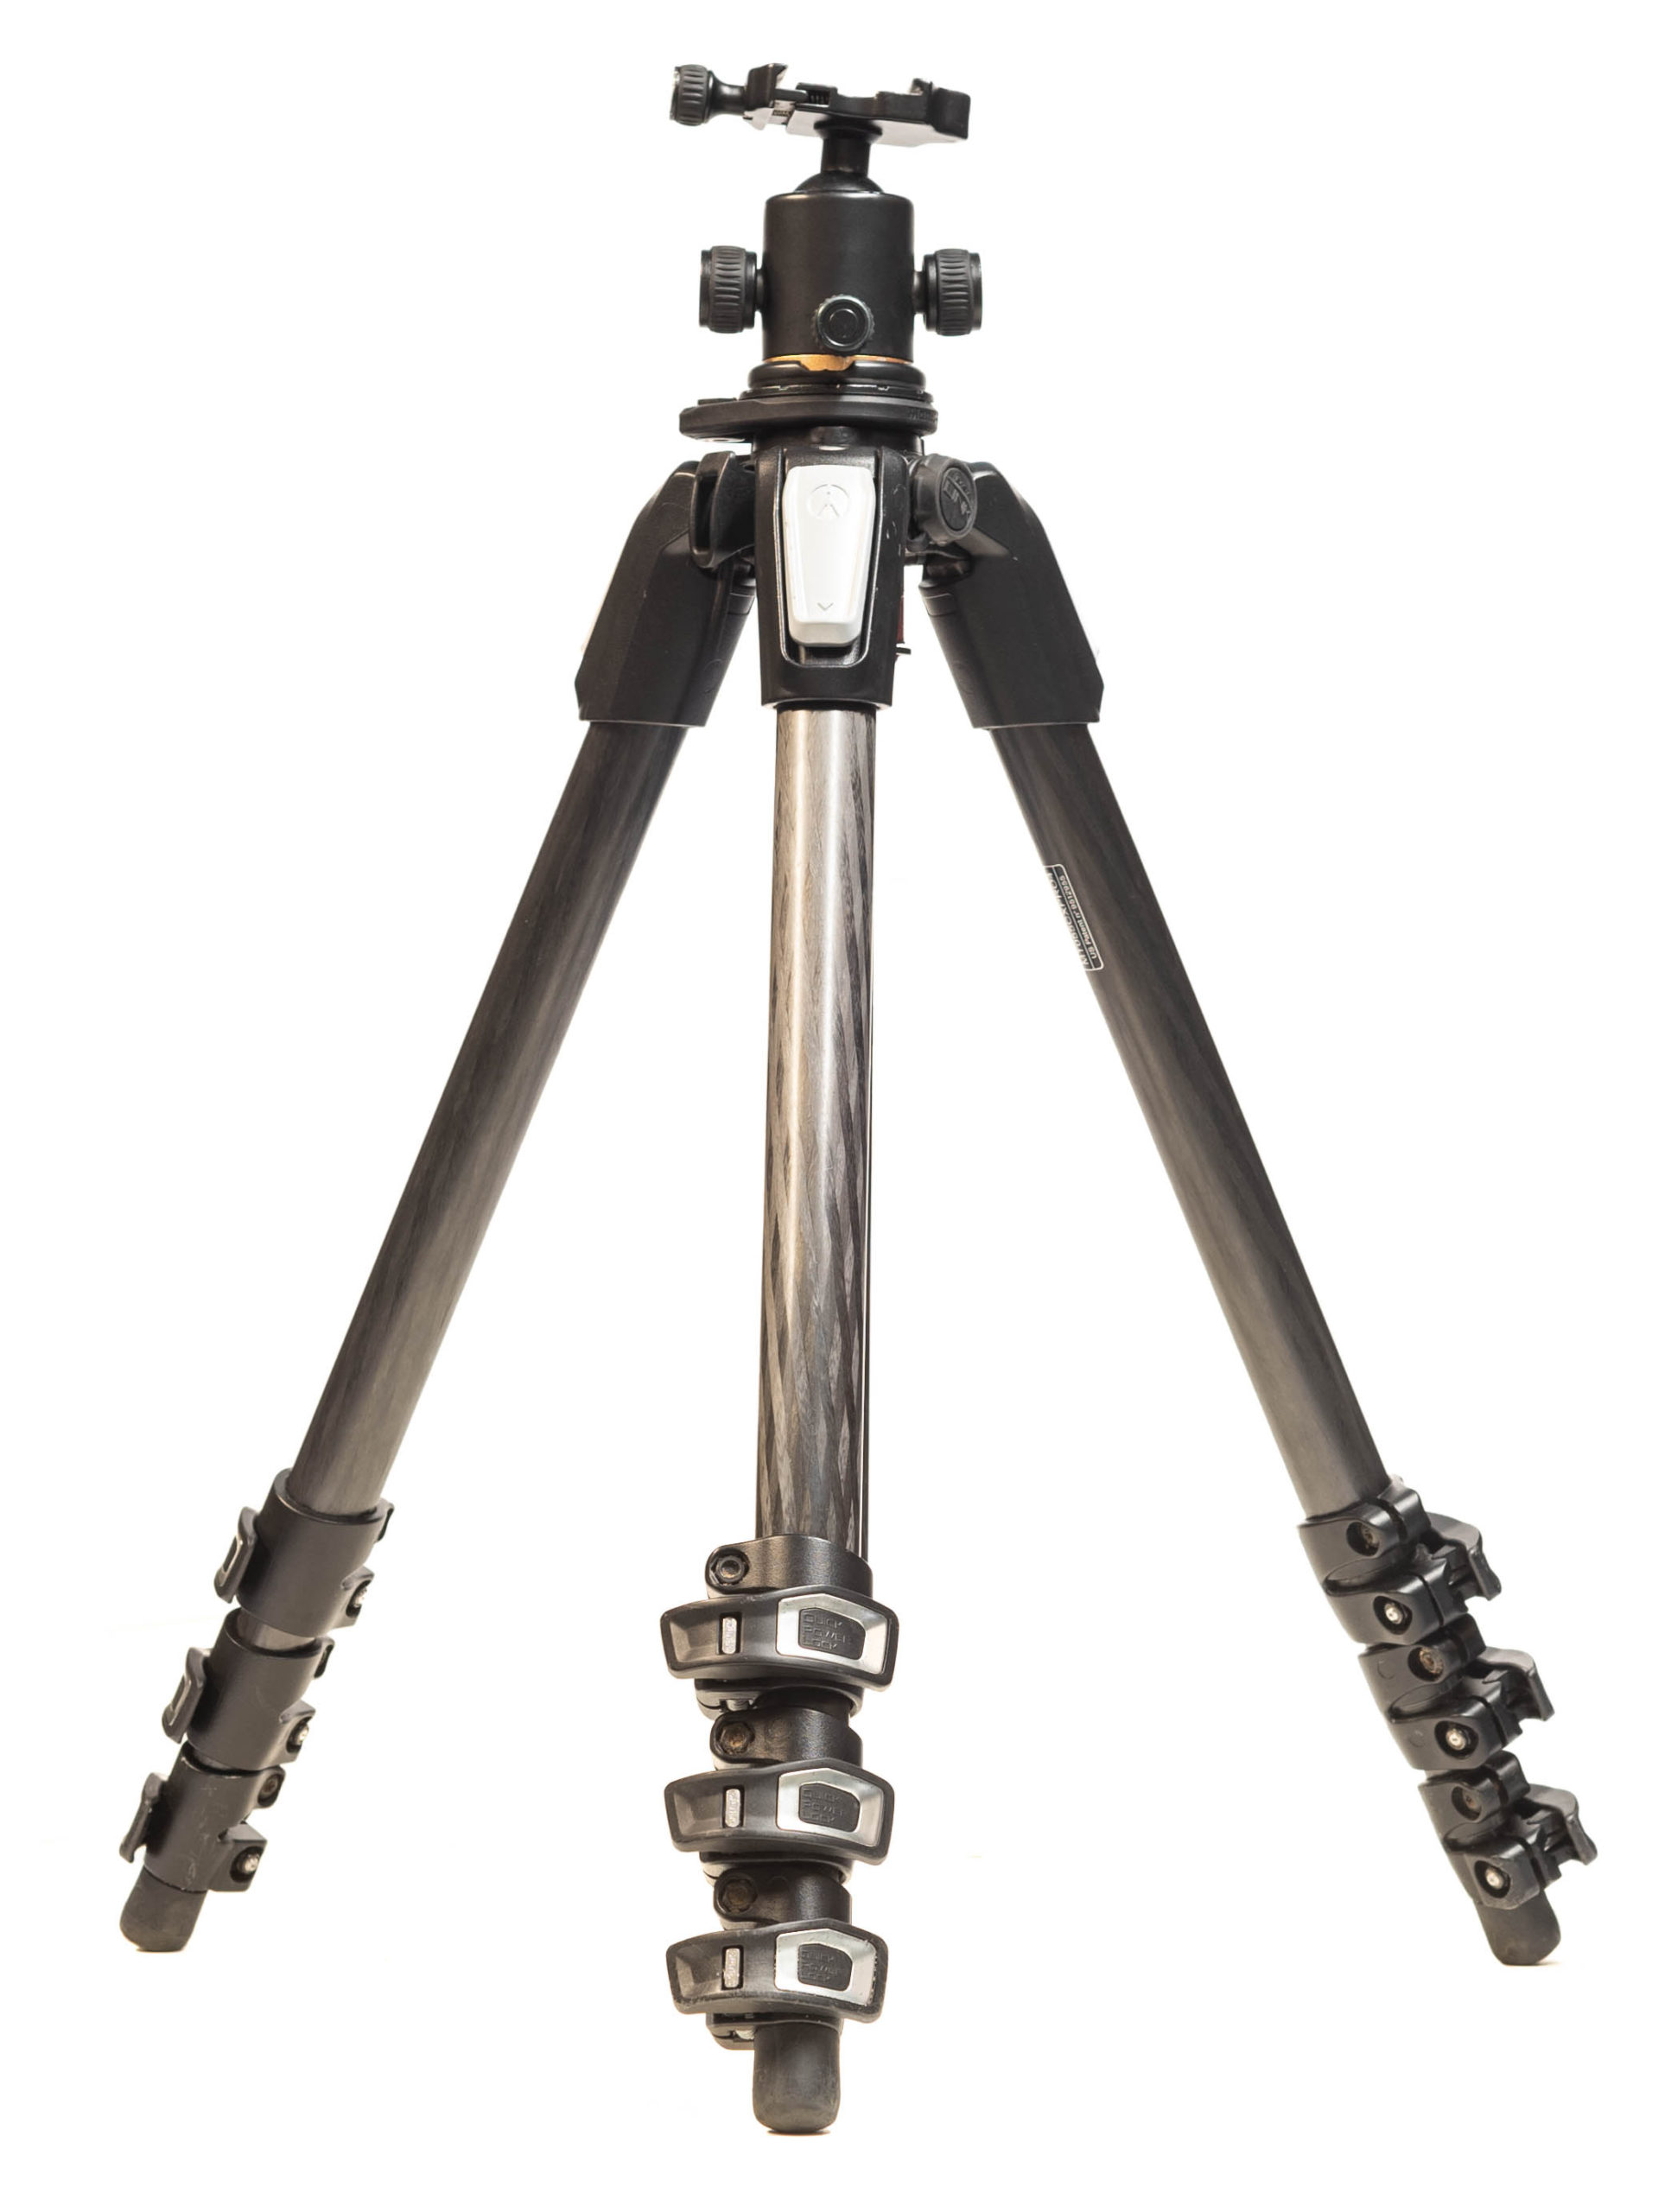
When shooting at these high focal lengths, a tripod is crucial to obtain a sharp image! Think of the lens being more zoomed in as more sensitive. The slightest touch and the shot will be blurry.
Shutter Remote
Besides a tripod, a shutter remote (intervalometer) is very important because we want to minimize the shake altogether. Even with a tripod, once you click the shutter button, a slight shake goes throughout the camera.
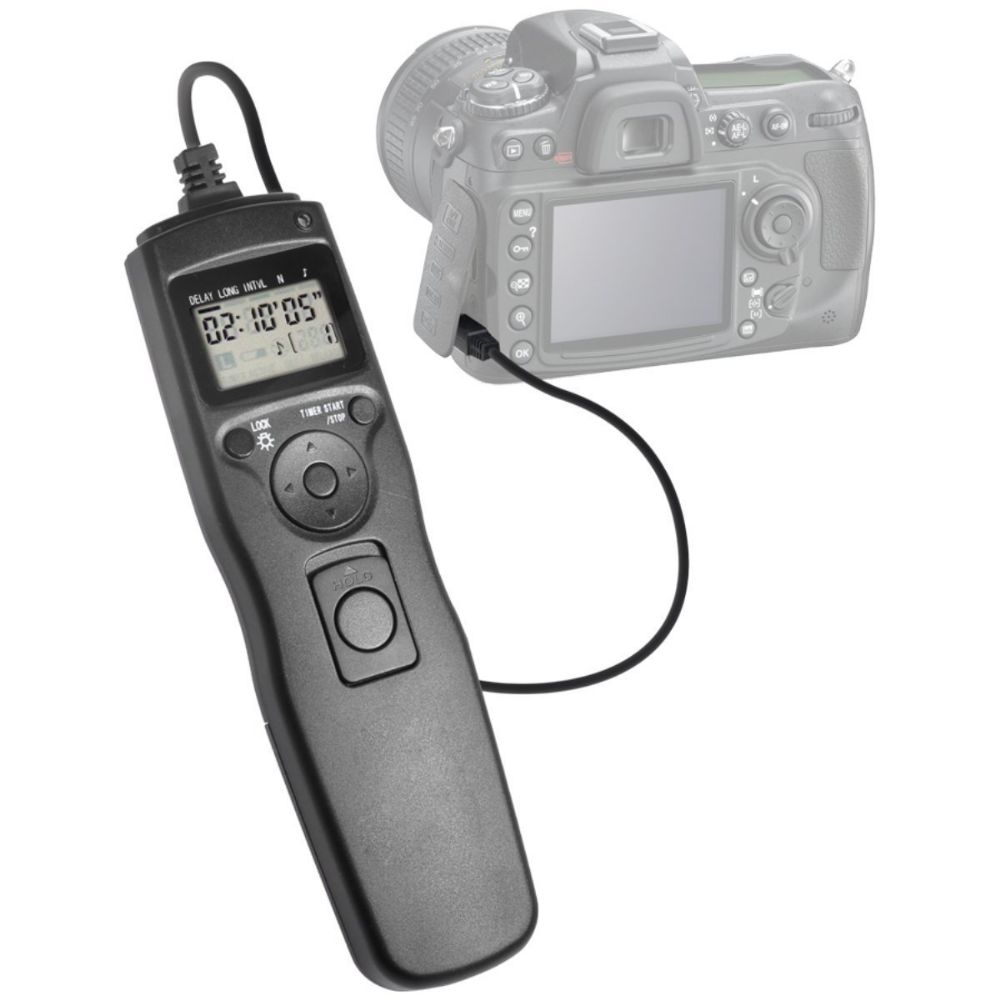
In order to avoid this, use a shutter remote. You can stand right next to your camera and never have to touch it while taking the picture. Perfect system.
Remember to find a shutter remote that matches your camera model. Otherwise, it won’t fit your camera.
An alternative option is to use the self-timer mode on your camera. Setting it to 2 – 5 seconds will be plenty of time for any shake to go away.
Camera Settings
Low ISO
Keep the ISO between 100 – 400.
Since the ISO affects the brightness of the image, If it goes too high (500 – 1600 range), the moon will be blown out.
Fast Shutter Speed
The shutter speed should be set anywhere from 1/250 – 1/1000 sec.
Remember that the moon (especially the full moon) is extremely bright. Be careful not to overexpose the image and lose all of the detail in the moon.
Small Aperture
An aperture of F/8 – F/16 should work just fine. Using a high aperture will guarantee that you capture a lot of detail in the moon’s craters.
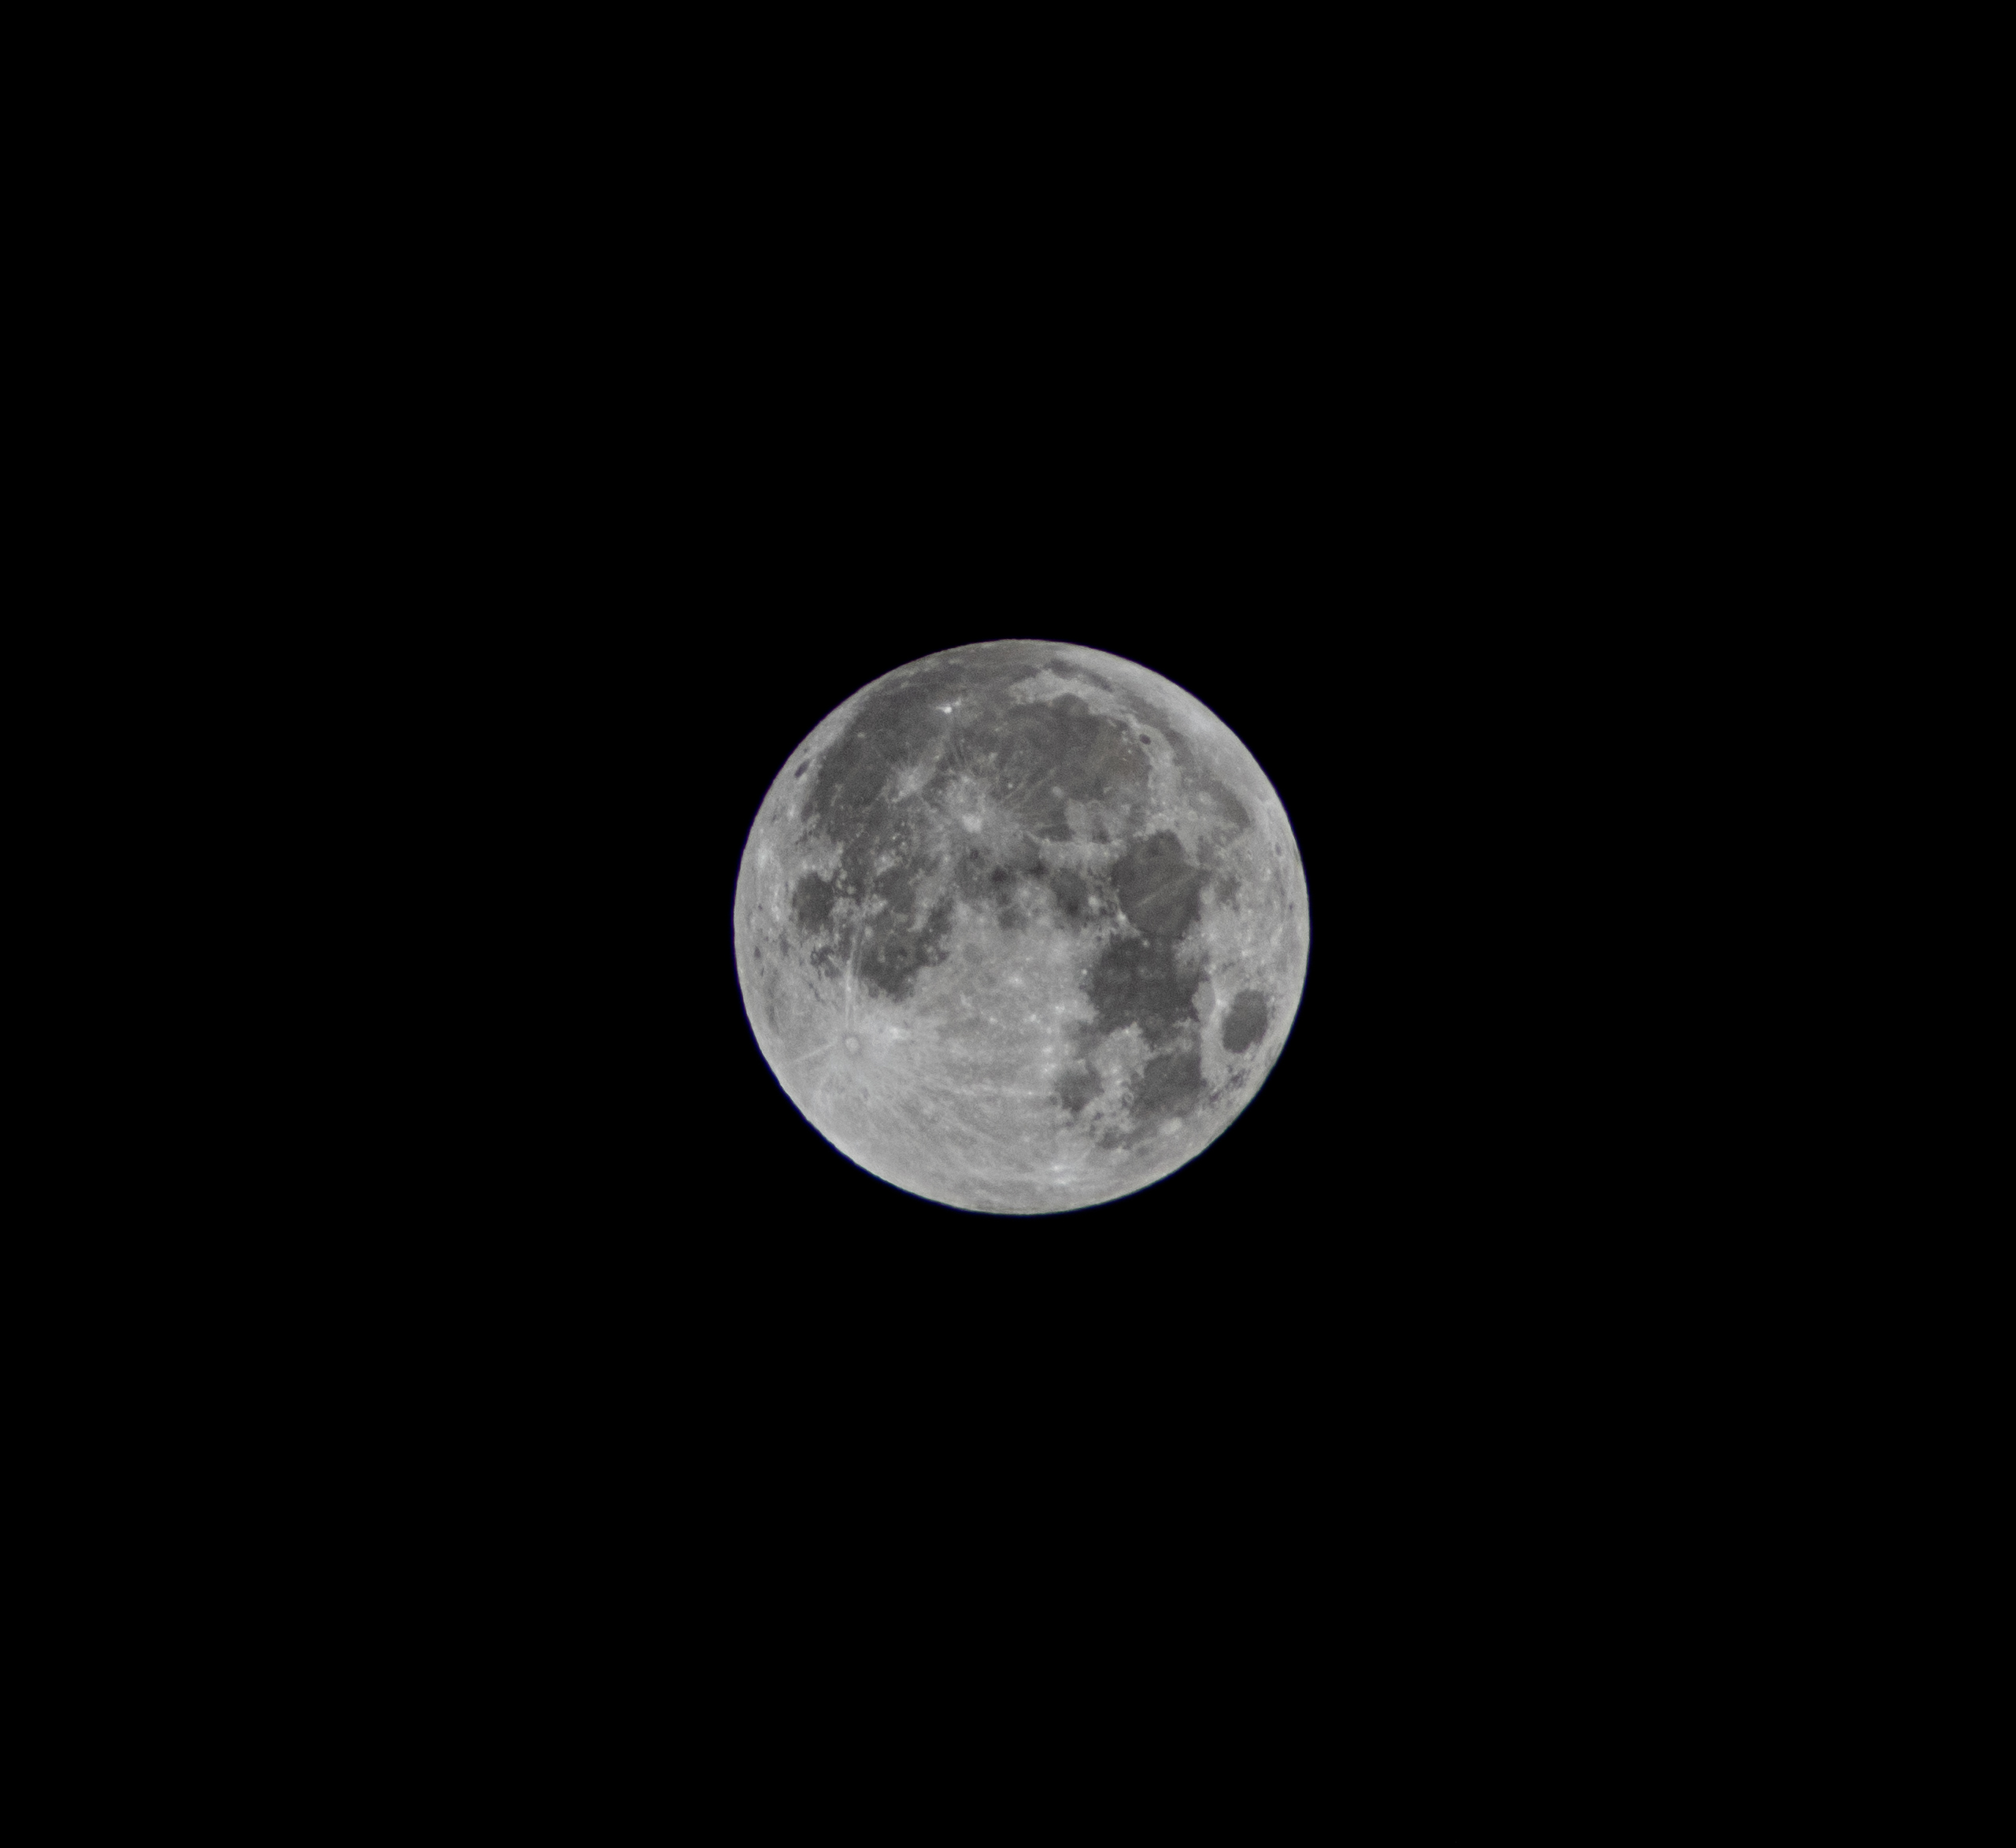
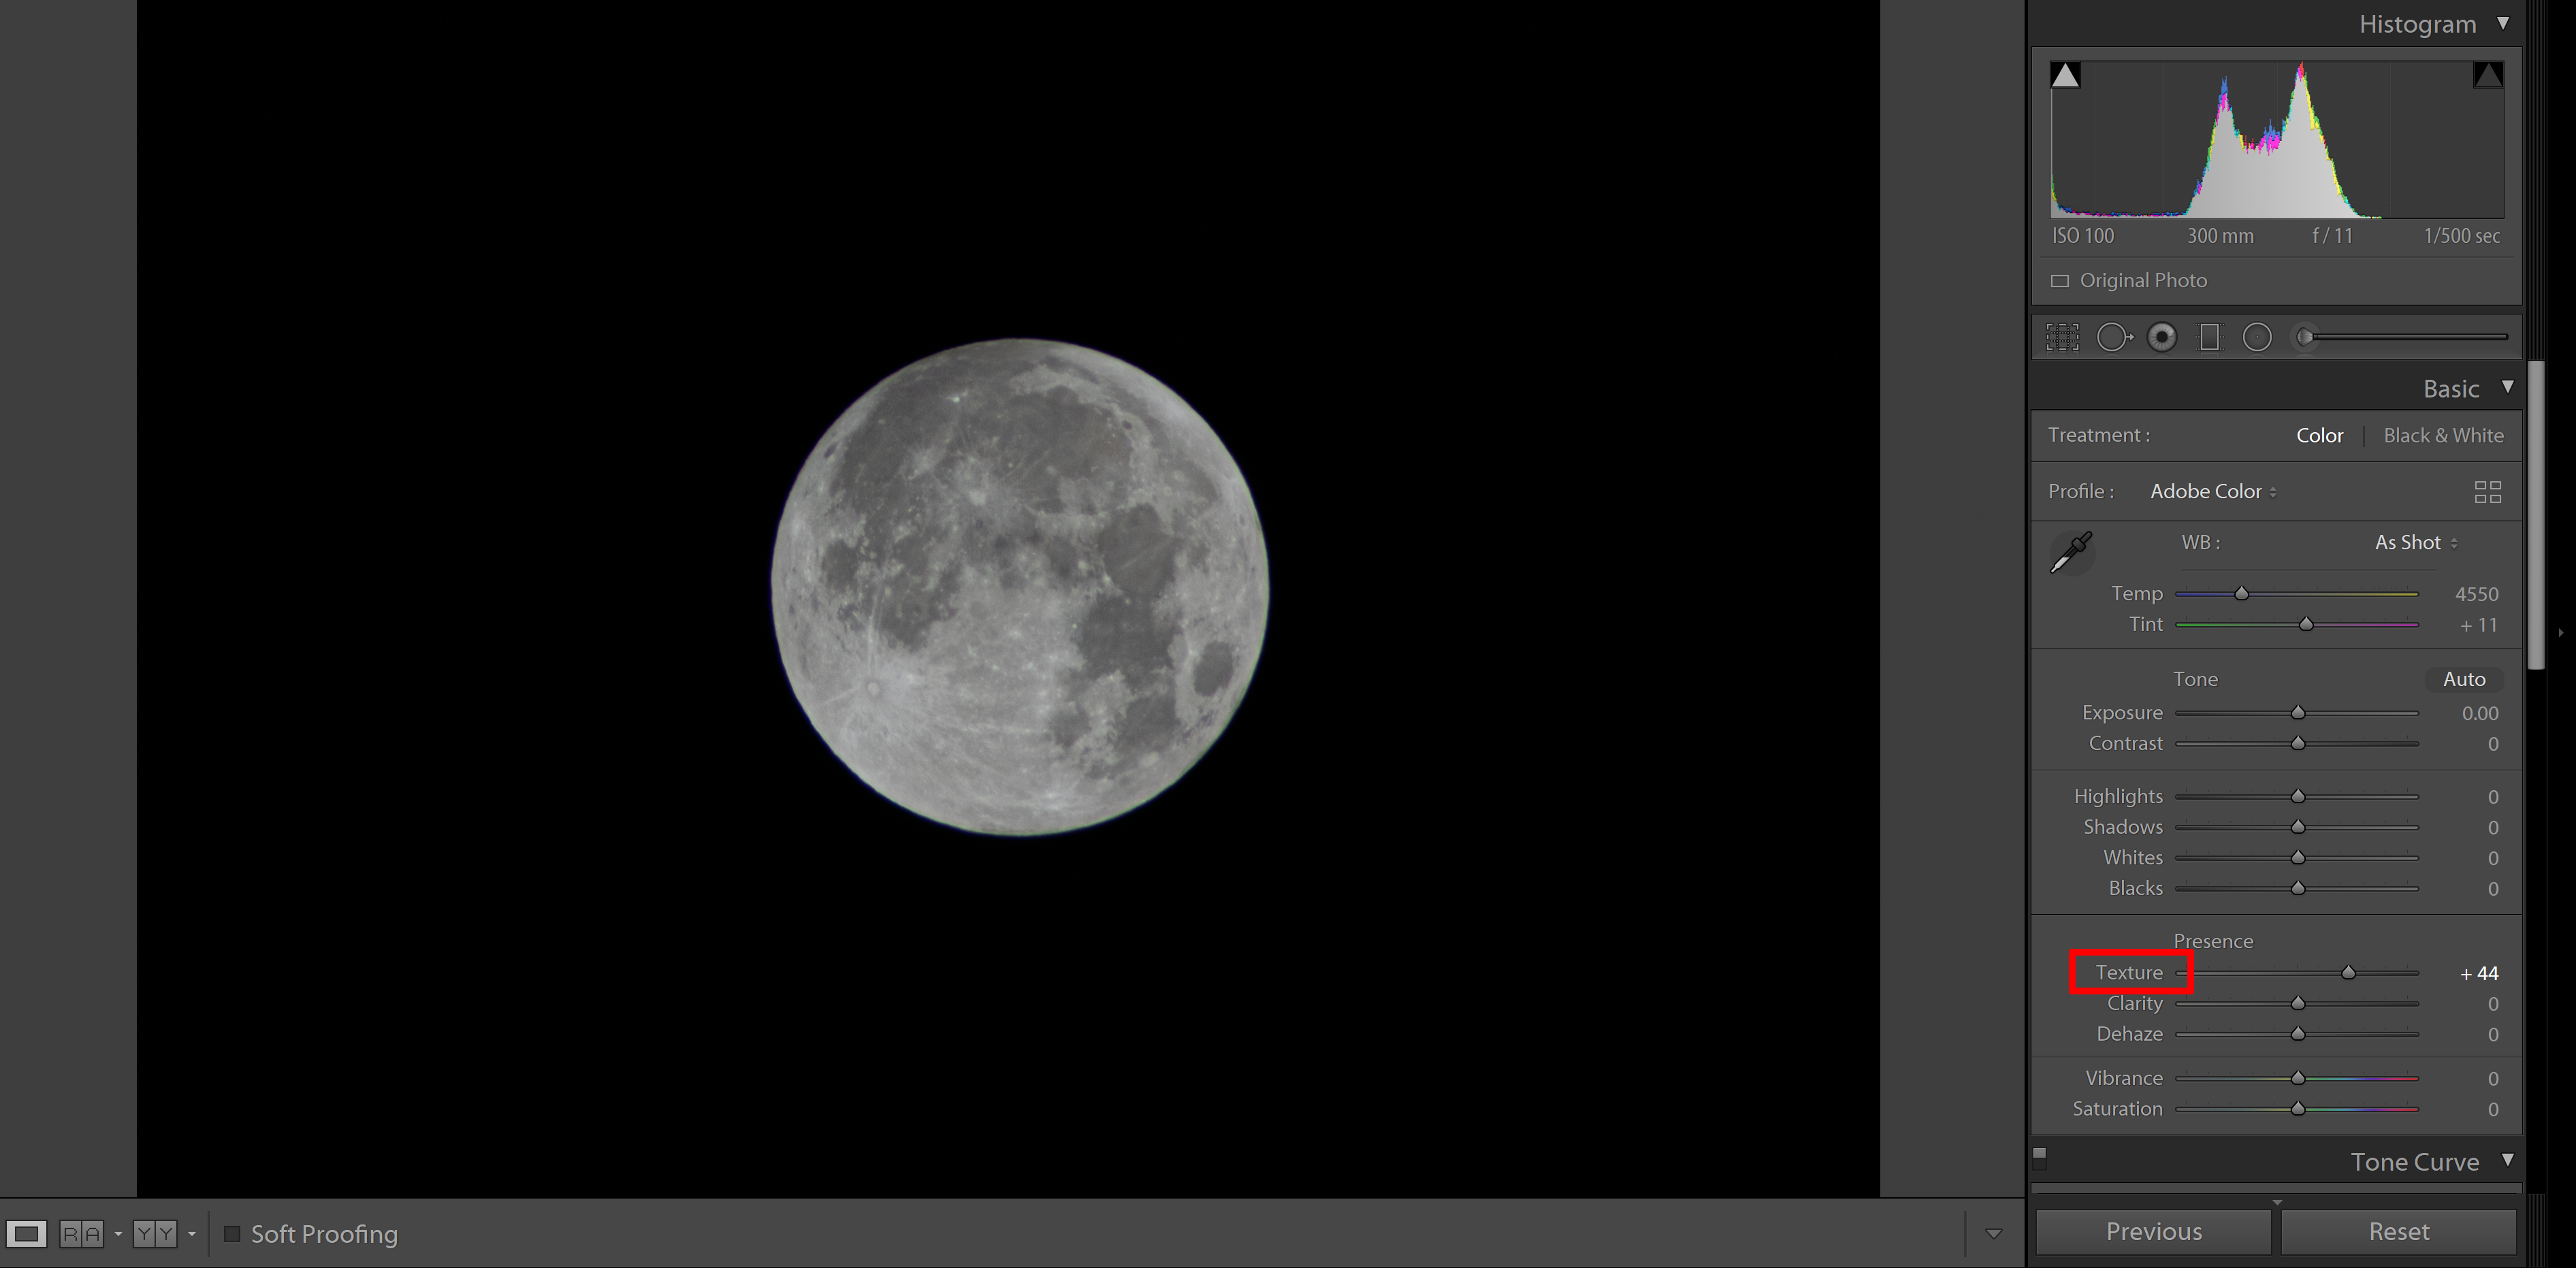
The settings for the image below:
- Shutter Speed – 1/500 sec.
- Aperture – F/11
- ISO 100
- Shot at 300mm on an APS-C Camera
Auto White Balance
Set your white balance to auto (AWB) to maintain a nice neutral moon in the camera.
Shoot RAW
Photographing in RAW means your image files contain more information than JPEG files, allowing you more flexibility when editing the image.
Focus Manually
Since the moon is so far away, autofocus would hunt like a mad man to achieve perfect focus. Instead, go to live view, zoom all the way in, and manually focus on the moon.
There is nothing better than capturing a great picture of the moon that is crisp and fully in focus!
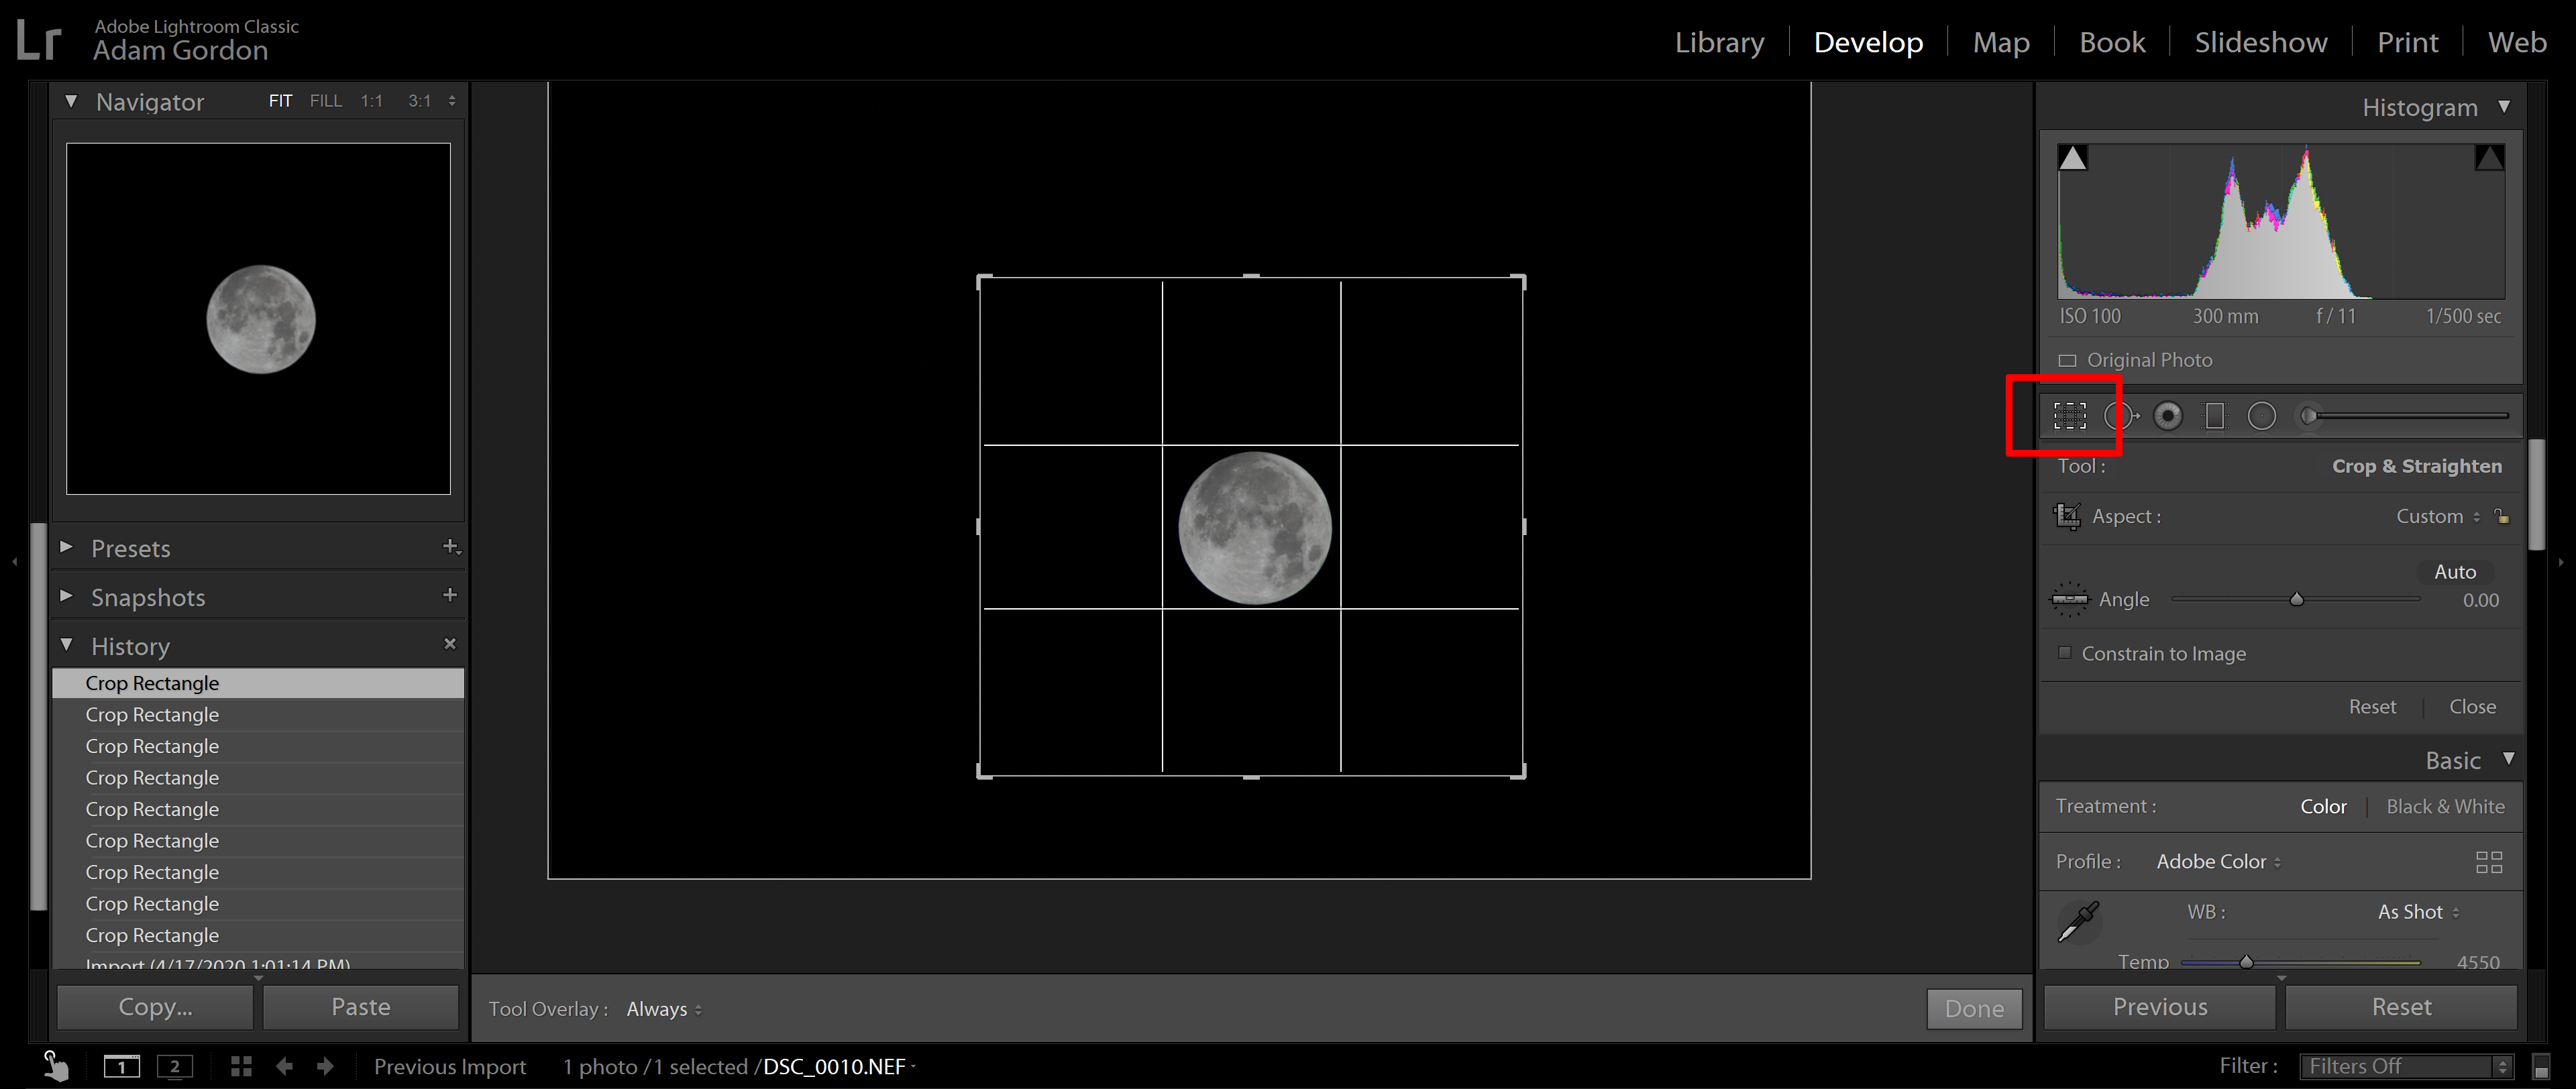
Post Processing
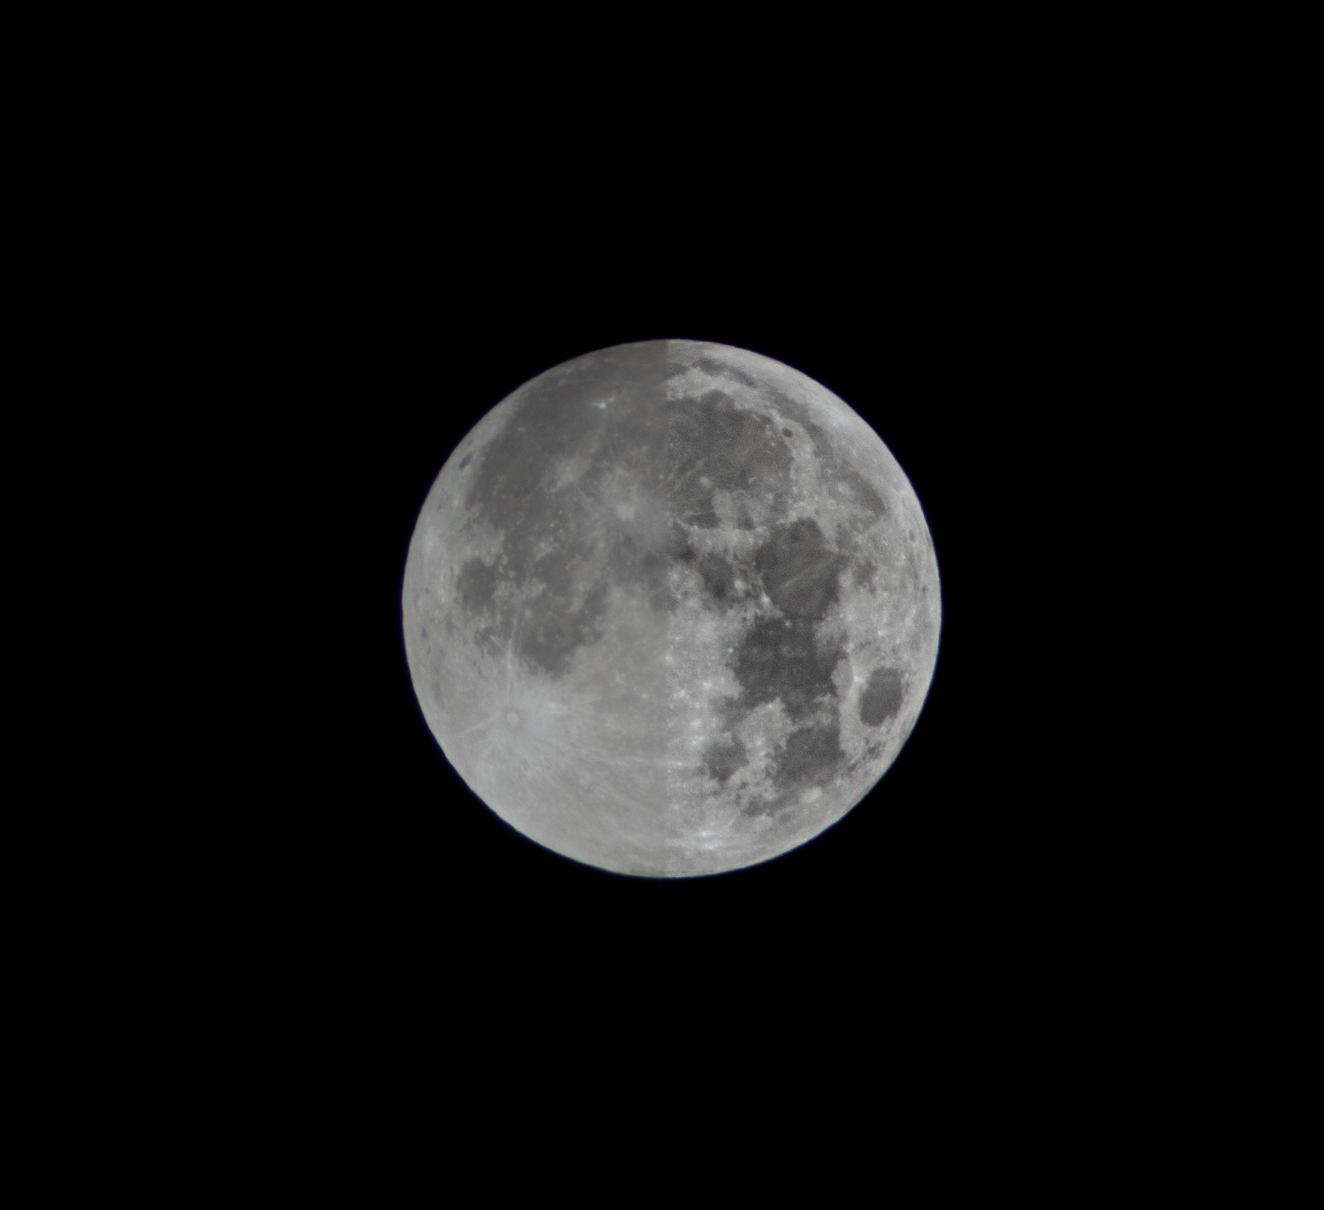
Another great aspect of moon photography is that it doesn’t require much editing. If you want to learn how to edit in Lightroom, click here. As shown below, with only a few adjustments, you will be ready to showcase your moon photos to the world!
1. Open your image in Lightroom and go to the Develop Module.

2. Click the crop tool and have the moon fill most of the frame and be centered.
3. I first moved the Texture Slider to +44.
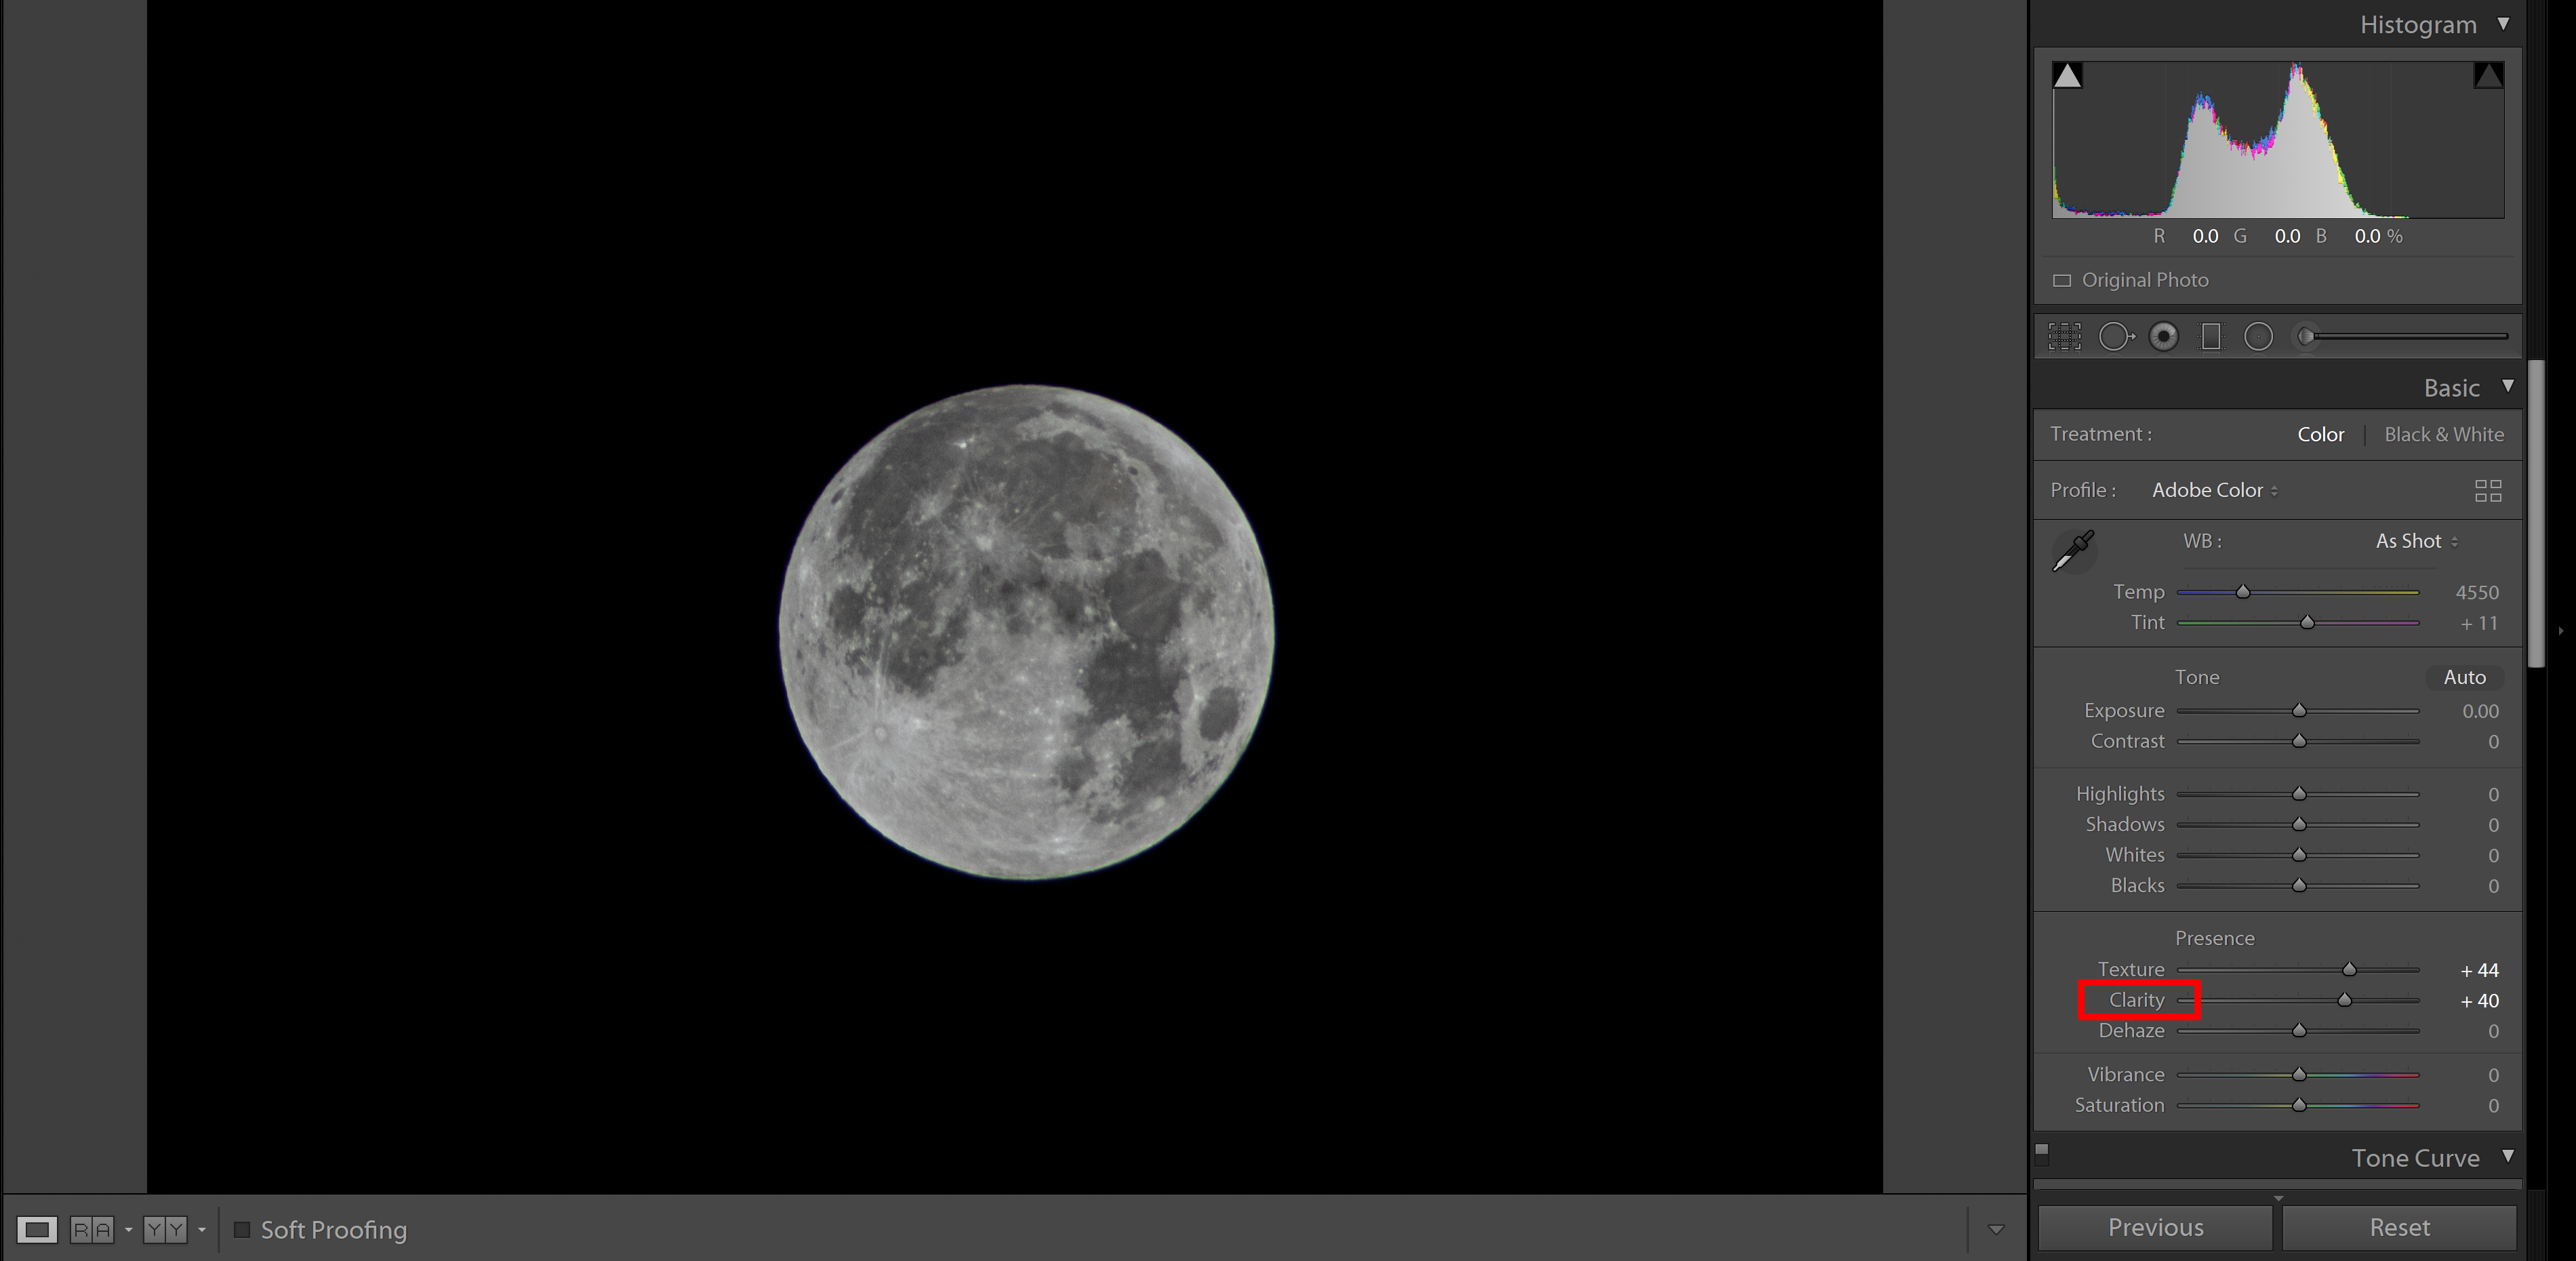
4. I then moved the Clarity Slider to +40.
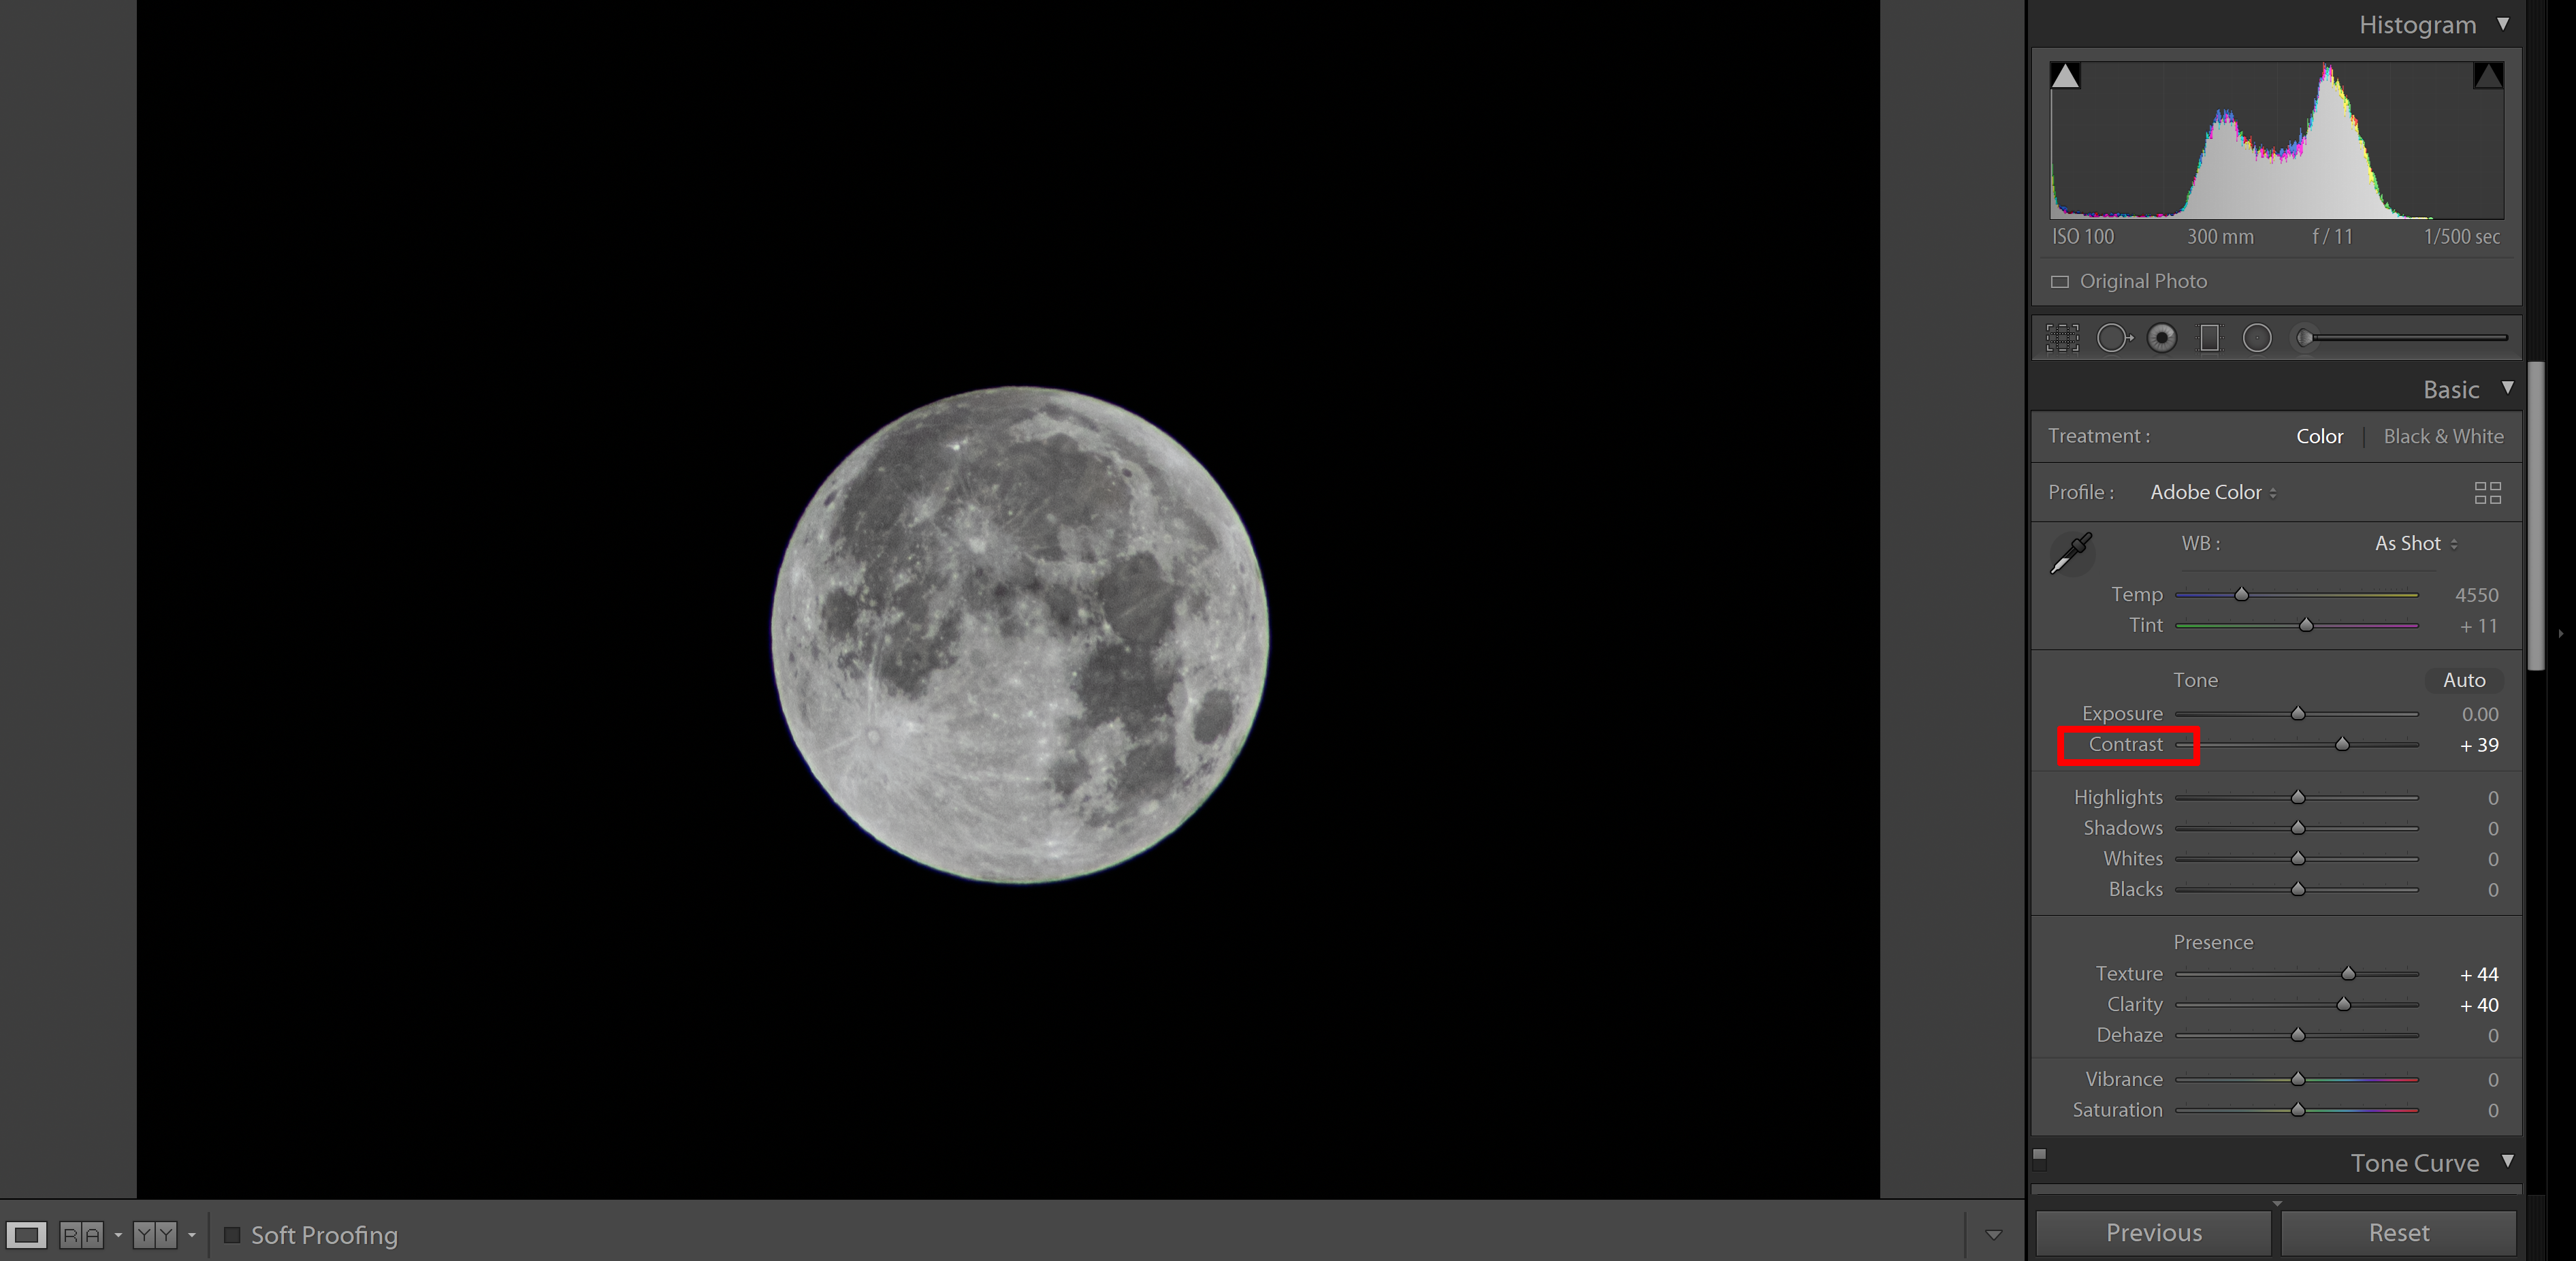
5. Next, I moved the Contrast Slider to +39.
6. Lastly, I moved the Highlights Slider to -4.

After seeing the Before and After, you can see how a few adjustments go a long way!
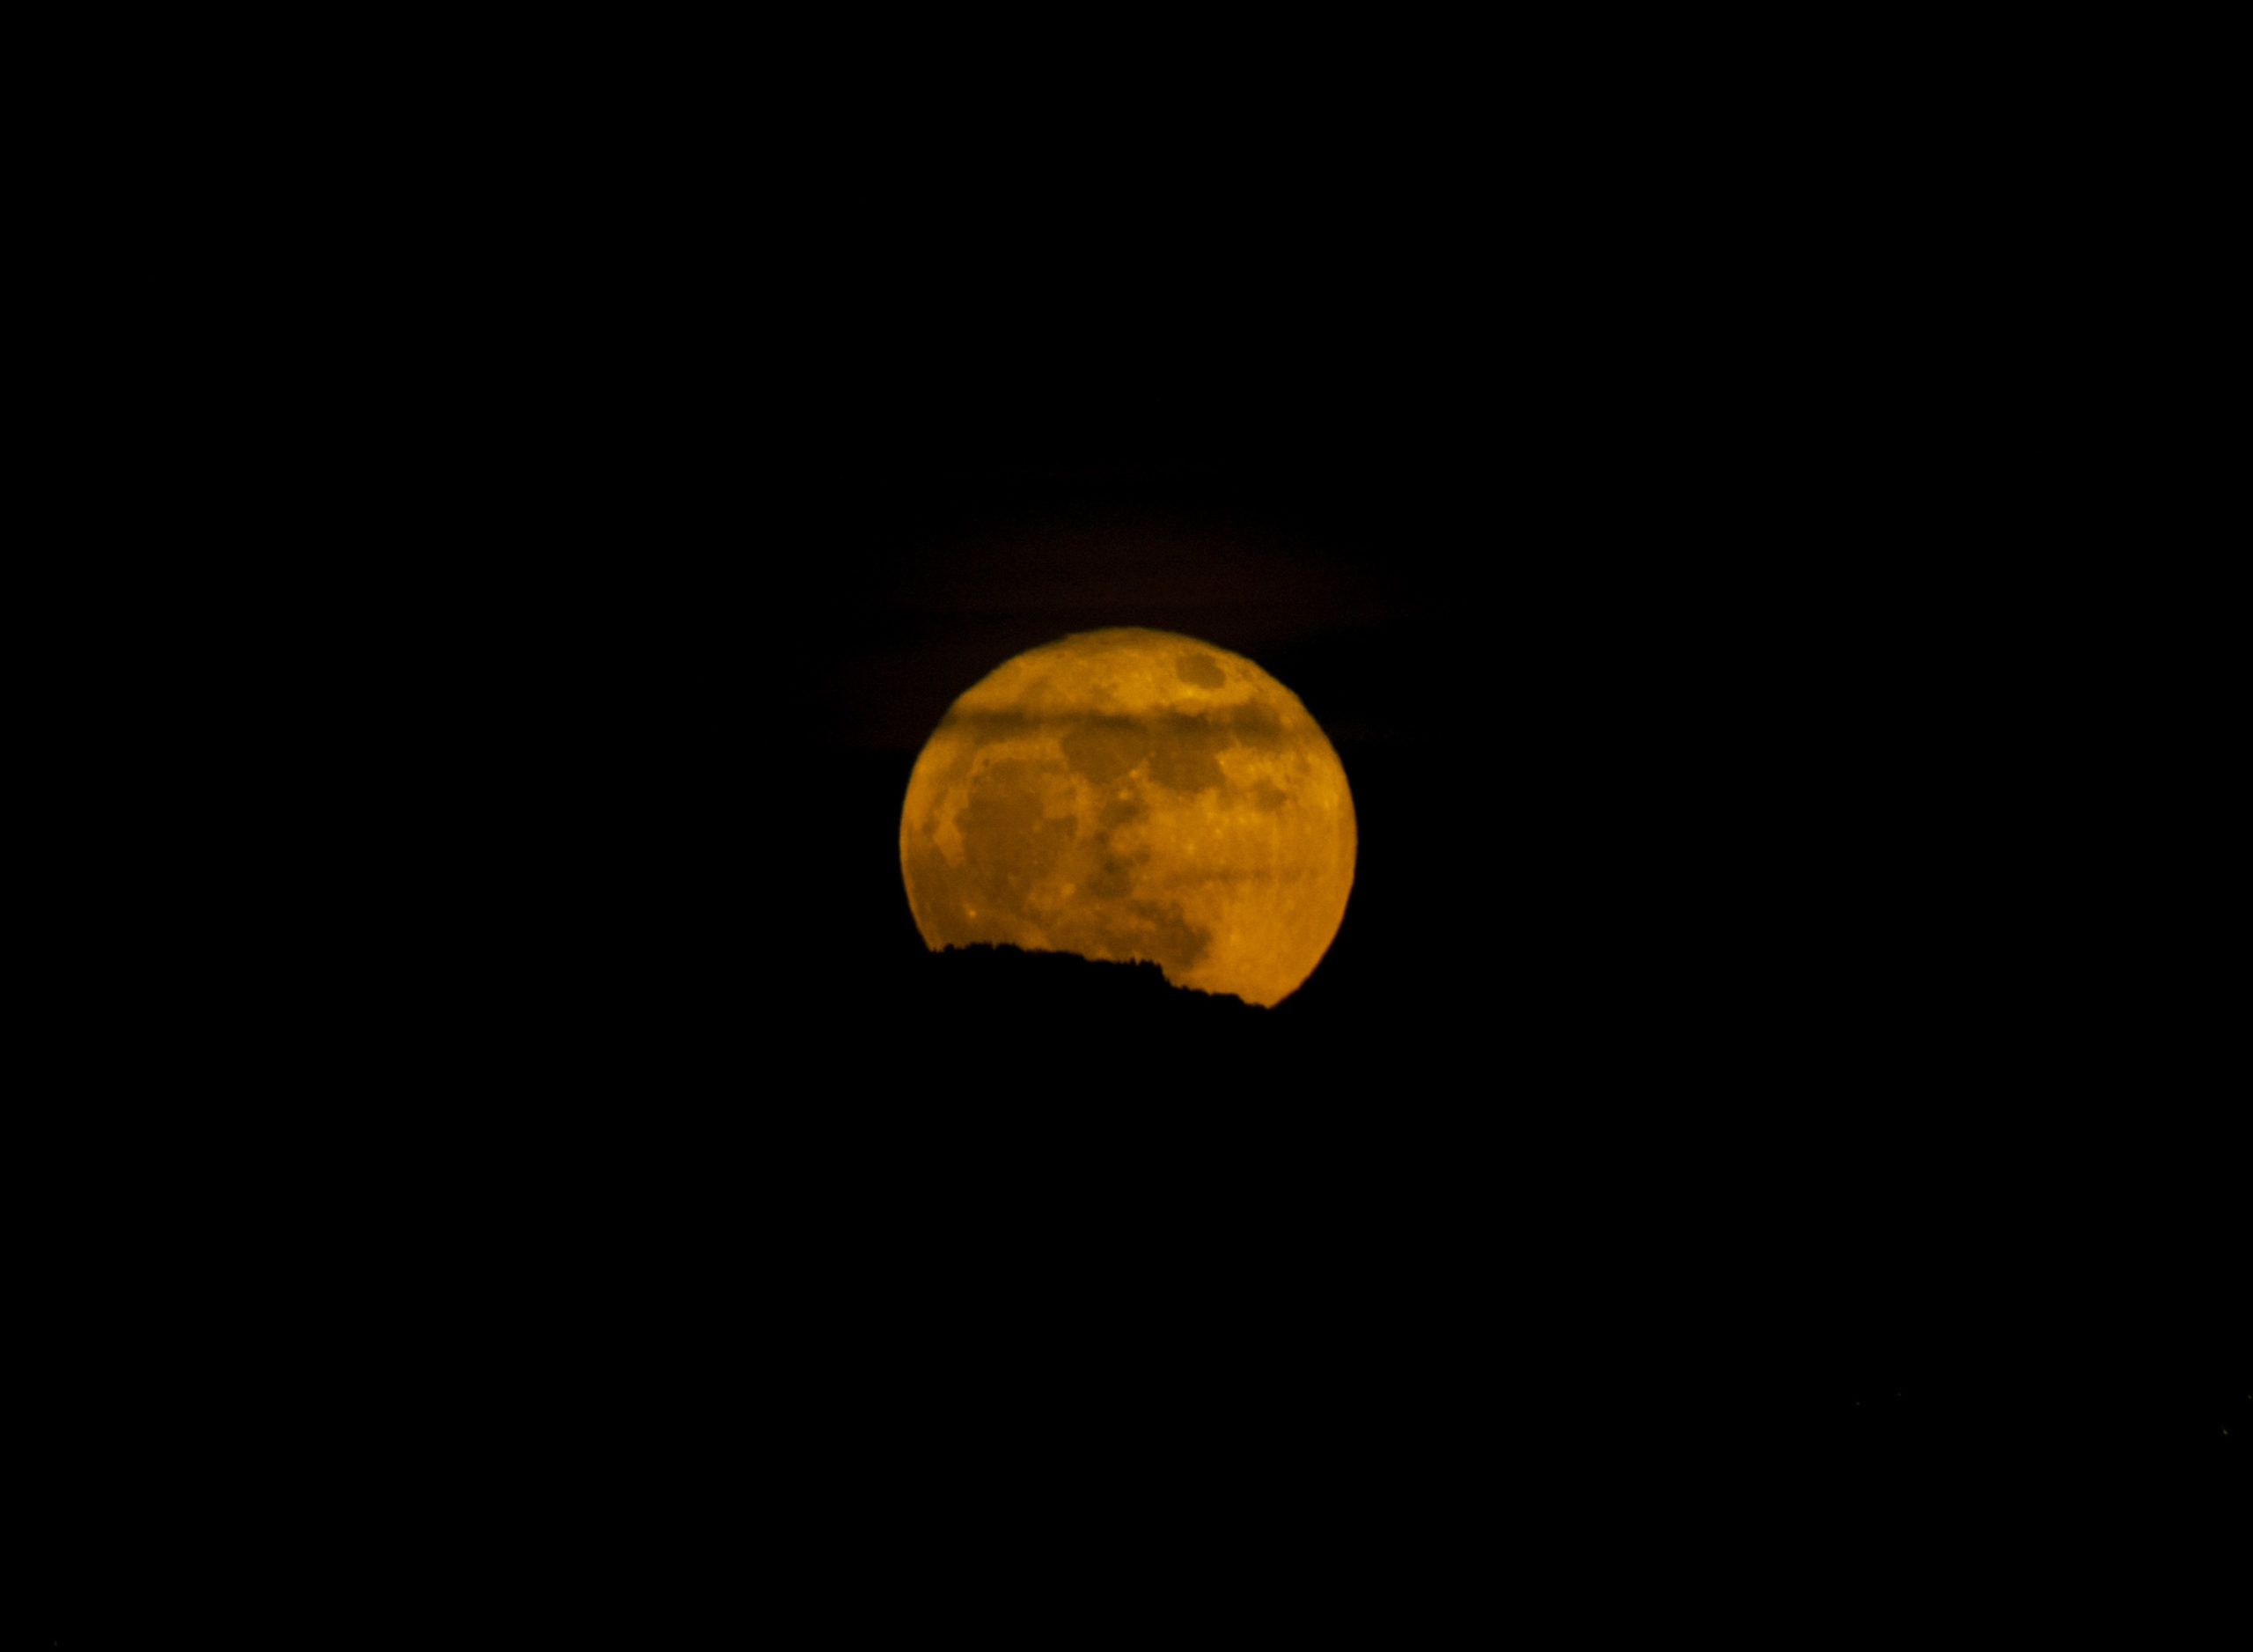
One last tip is to photograph the moonrise! When the moon is close to the horizon, it appears larger, making the view and the picture that much better! It also can cast an orangeish hue, making your moon images more unique!
The moon is a very photogenic subject, so experiment with it!
Have fun and clear skies!